|
|
#1 |
  Join Date: Aug 2009
Location: South Dakota/California
Posts: 3,797
|
-Solutions- ALERT  The BIG Trick for Photo Album Use on the Registry is..... After you have selected 800 or 400 or other pixels using Paint (or other photo pixel resize software) on your computer and applied to any photo on your computer....and after you have uploaded that photo to your Registry Album of Albums. Once the photo is in your Registry Album (resized by PAINT on your computer) you go to that Album and LEFT Click on the photo....It will then appear the size you PAINTED. You then select and copy the BB Code. Then Paste the BB Code into a post. Another way is to LEFT Click on the photo......It will then appear the size you PAINTED. You then right Click and Select Copy. Left Click on Insert Image in the Post Heading and Paste the Copy in the Insert Image Box. Click on OK and the image will be Inserted where your curser was set before you selected Insert Image. Improvements In Solutions. A significant reorganization of -Solutions- has been accomplished and includes eight continuous posts of regorganized Headings. The reorganization makes it easier to obtain specific technical information as required. Mar 5th 2012 - -Solutions- has been modified considerably in appearance (The Second Generation) by using Link Names for all references. Link Names show up as (Underlined Descriptions) which you can Left Click to upload the reference. Aug 24th 2012 - -Solutions- has been modified considerably in organization (The Third Generation) by reorganizing -Solutions- into 8 Posts with many additional Link Name References. Apr 2013 - -Solutions- has been upgraded (The Fourth Generation) with all thread/post references checked and verified. Some posts in threads had been deleted and/or photos in posts hosting photo web sites not maintaned. Aug 2013 - CF -Solutions- were expanded and made identical to the Registry Forum -Solutions-. Both are being maintained equally  A post on this Forum cannot exceed 30,000 characters. This limitation in post characters required reorganization of -Solutions- posts to meet this requirement. Any word or group of words underlined are left clickable Links. Many who post on this Forum no longer use Photobucket. Many of those original posts using Photobucket have lost the photos. Those posts are gradually being replaced with posts that do show associated photos for clarity. See Solutions on how to copy a functional (with left clickable references) -Solutions- to a WORD Document on your computer. A. Acronyms are often used we are not familiar with...... 1. See Common Forum Acronyms 2. See Complete Automotive Acronym List Ebay Searches and Acronyms B. Using Forum Albums for Posting Photos. Resizing Photos for Forum Posts and Creating Reference Links Using Forum Photo Albums……Resizing photos C. Organization Of Solutions. Post 1 to Post 8 includes an Index (-Solutions-) for all issues related to the C4 ZR1 with LT5 engine as well as the C4 Corvette with L98 engine. The eight posts are orgainzed by category. The Posts References are all shown as clickable Link Names with those posts associated with the C4 Corvette (L98) starting with the word L98. All other posts refer to the ZR1 (LT5). OVERVIEW Post 1. -SOLUTIONS- Overview and Ebay Searches Post 2. ZR1 General Post 3. ZR1 Electrical Post 4. ZR1 Engine Post 5. ZR1 Drive Train Post 6. ZR1 Engine Fuel, Lubrication, Cooling, and Exhaust Post 7. ZR1 Specifications, Restorations, Air, Audio, Lifts, and Road Trips Post 8. ZR1 Engine (LT5) Bolts and Hydraulics Post 9. New Secondary Port Throttle Vacuum System for 1990-1995 Post 10. Phil's (Jagdpanzer) Fuel Pressure Regulator Solution 1. -Solutions- Index Posts are Organization by Function. Engine HEADINGS are arranged from front to back and top to bottom and Drive Train HEADINGS are arranged from Bell Housing to Differential to Wheels for example. 2. All Polls and Key instructions/suggestions (TIPS) are listed in Bold Red under each Heading. 3. ALL VIDEO is listed in Bold Red before Polls and TIPS. 4. Links to Off Forum Information Web Sites are listed in Bold Dark Orange. 5. Links to Other Technical Posts and all Calculation Methods are listed in Bold Blue. 6. Occasionally better or more descriptive Solutions appear in new posts which will replace old Solutions in this index. Occasionally new Solutions are found in old archives which will be added to the -Solutions- index. The latest date of updates for each of the 8 -Solutions- posts can be found at the bottom of each post including this post. 7. All posts referenced in -Solutions- are open posts wherein once directed to that post you can scan the entire thread forward or backward as you like. A few Solutions references will take you to the beginning of a thread if the Solution is a process such as a restoration. 8. All professional service sources , all sources of parts, all Ebay searches for parts, and all sources of lubricants are listed last in Bold Dark Green under each Heading. D. HOW TO CREATE (Links, Photos, Videos, Messages, Posts) Photobucket issues Using Forum Albums for Posted Photos TIPS Registry Forum Albums TIPS How to Post Photos TIPS Old Forum Link TIPS Creating Albums and Hosting Post Photos TIPS Using Albums on various Forums to Host and Post Photos TIPS Creating Albums on various Forums TIPS Converting Pixels to Inches Creating 3D images Resizing Photos for Forum Posts and Creating Reference Links Link Name Signatures Creating Reference Links Posting References and Link Photos How to get to old links Using ImageShack Using Photobucket Using PutFile How to post a video Instant message Random images Show Car Displays If you insert a picture in a Post on this forum as cited above using photobucket and then change your photobucket picture title in any way or delete that picture in photobucket, the picture will also be deleted in the forum Post you pasted it in. Most of the pictures cited in this index have been copied just in case. E. Smilies     F. SUMMARY Ebay Searches Ebay Corvette Electrical Section 8A Ebay Corvette Ignition Key Ebay radiator Comb Ebay LT5 2902 engine mounts Ebay LT5 2713 engine mounts Ebay LT5 PVC CV913C Ebay LT5 PVC CV769C Ebay LT5 Plug wires Ebay LT5 Service Manual Ebay LT5 Thermostat Ebay LT5 Water pump Ebay Power Antenna Mast Ebay ZR1 Bosch 69225 Fuel Pumps Ebay ZR1 LT5 Ebay ZR1 LT5 Chain Ebay ZR1 LT5 Belt Ebay ZR1 LT5 Bolts Ebay ZR1 LT5 Engine Ebay ZR1 LT5 Gaskets Ebay ZR1 LT5 Plenum Ebay ZR1 LT5 Secondary Ebay ZR1 LT5 Throttle Body Ebay ZR1 Alternator Ebay ZR1 Bose Ebay ZR1 Brake Pads Ebay ZR1 Cat Back Exhaust Ebay ZR1 Clutch Cylinder Ebay ZR1 Coolant Ebay ZR1 Corvette Clutch Ebay ZR1 Radiator Ebay ZR1 Spark Plugs Ebay ZR1 Starter Ebay Autometer 2343 The Ebay search terms are defined to maximize Ebay searches for parts. The Ebay searches located within some Headings in Solutions will allow you to go directly from a specific Heading in Solutions to the related parts search on Ebay. The Ebay search is current and will show the most recent ZR1/LT5 parts available on Ebay. PARTS PHOTOS AND ESTIMATED VALUE Part Estimated Value Post 310 - Parts Estimated Value Last UPDATE of post 1 Dec, 2024 Last edited by Dynomite; 1 Day Ago at 10:21 PM. |
|
|

|
|
|
#8 |
  Join Date: Aug 2009
Location: South Dakota/California
Posts: 3,797
|
ZR1 Engine (LT5) Bolts and Hydraulics   LT5 Bolt Charts with suggested bolt torque, loctite and antiseize application information are included above. The free chart from Jerry's Gaskets which provided the basic LT5 component bolt sizes has been considerably modified into two charts above. The charts have been organized by function. If you could only use one Tool....use the Metric Flex Head Ratchet on LT5 Nuts and Bolts. 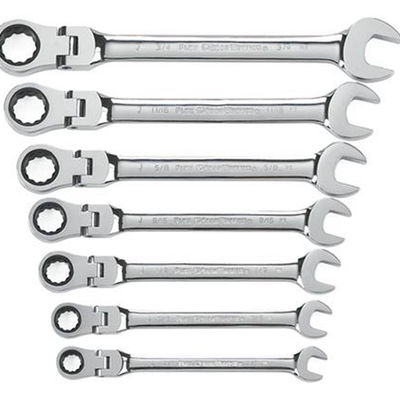 Hydraulic Fitting Size comparison AN (Army and Navy).....-2.........-3...........-4.........-5.........-6..........-8........-10.......-12 Tube OD (Hose ID).......1/8".......3/16"...... 1/4".......5/16".....3/8".......1/2"......5/8"......3/4" SAE thread size...........5/16-24..3/8-24.....7/16-20..1/2-20...9/16-18..3/4-16...7/8-14..1-1/16-12 Pipe thread size (NPT)..............1/8-27.....1/4-18................3/8-18....1/2-14..............3/4-14 Metric Pipe Thread Fine........10-1.5........12-1.5....14-1.5.....16-1.5....18-1.5.....20-1.5 1/8 inch NPT Drill is 21/64 or 11/32 inch. Aluminum Allen Head 1/8 inch pipe plugs found here. Speedway Motors Aluminum Stat-O-Seal washers with molded Buna-N inner seals are much more reliable than the more common steel stat-o-seals. If the rubber portion fails to make contact all around the port, the aluminum will act as a crush washer, providing a reliable metal to metal seal. Use them to seal screws, bolts or plumbing fittings. The Buna-N seal is resistant to petroleum fuels and oils. Pegasus Auto Racing Stat-O-Seal Inside Diameters vs. Outside Diameters ID Size...#6 (0.138")..#10 (3/16")...1/4"..5/16"...3/8"..7/16"..1/2"..9/16"..5/8"...3/4"...7/8"..1.00" OD Size............ .38".......... .44".. .50".. .60"... .66".. .76"... .88"...1.06"..1.19".1.32"..1.51".1.76" SS Braided Oil Cooler Hoses and Fittings 1. Tools. One 10 inch cresent wrench (Box Wrench is best), One vice, Air compressor, Angle Grinder (with Cut Off wheel). The best tool for cutting the SS Braided Hose is a Small Angle Grinder (with Cut Off wheel) which does not fray the SS braids on the hose ends. It is also best to use an appropriate size Box Wrench on the Hose Fittings (box end) to minimize leaving marks on the fittings. I use Aeroquip Reusable Fittings and SS Braided hose from Summit Racing. 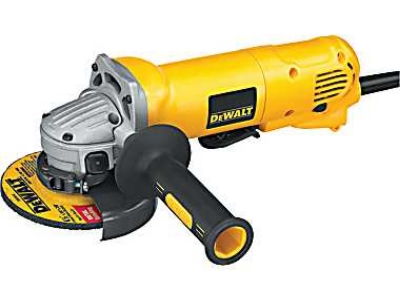 To remove existing 12AN x 3/4 NPT fittings from the Oil Filter Housing use a 1 inch box wrench (combination box/open end) with the box end on the fitting interlocked with a 3/4 inch box wrench on the other end. This will provide the leverage/torque without excessive horizontal pressure to remove the fittings. I use permatex when installing the New 10AN x 3/4 inch NPT fittings into the Oil Filter Adapter (lower fitting first). Let the ZR-1 sit over night before removing the existing Oil Cooler Hoses to minimize oil spilling. Use of 10AN Hose/Fittings I use all 10AN Aeroquip Reusable Fittings and 10AN Hose....The 10AN SS Braided hose I use has ID of 9/16 inch and the 12 AN SS Braided Hose has ID 5/8 inch. As it turns out.....the 12AN hose with 5/8 inch ID is identical to stock Oil Cooler Hose having ID of 5/8 inch. Also I noted the ID Fittings on the stock Oil Cooler Hoses on the Oil Cooler end where the tubing is located is less ID than the SS Braided 10AN Oil Lines. The Stock Oil Cooler hoses have 6 inches of steel tubing on Oil Cooler end that are identical in ID (9/16 inch) to SS Braided 10AN. Further, the Stock Oil Cooler hoses are 17 inches long as compared to 13 inches long for SS Braided Oil Cooler Hoses. The Oil Filter Adapter end of the Stock Oil Cooler hoses is only about 1/2 inch ID at the fittings. Which if you add all that up I would say the total head loss in the stock Oil Cooler hoses is about identical to the SS Braided 10AN with Aeroquip 10AN Fittings. 2. Measuring SS Braided Hose Length. A. Follow Step #3 below and make up one end of each SS Braided Hose (cut longer than required to reach the Oil Cooler Adapter) with the 45 degree Aeroquip Reusable Hose Ends. B. Install and snug up but not tight the 45 degree Aeroquip 10AN Hose ends onto the 10AN x 3/4 inch NPT fittings installed into the Oil Filter Adapter. C. Take the free SS Braided Hose ends curved freely around the radiator housing as they would look in the final installation. Mark the SS Braided Free Hose Ends along Red Line A and Red Line B as shown. D. Cut these Hose Ends about 1/4 inch longer than that mark. E. Install the 90 degree Aeroquip 10AN hose ends as in step #3 below. F. After installation of all four 10AN Aeroquip hose ends is complete, install the 90 degree hose ends on the Oil Cooler Adapter. G. Tighten the 10AN Fittings into the Oil Cooler Adapter (18mm x 1.5 or 6AN Straight Fittings). H. Tighten the 10AN 90 degree Aeroquip Fittings onto the 10AN male fittings of the Oil Cooler Adapter at the angles shown by CD and EF. Make sure there is a small gap between the bottom 10AN 90 Degree Fitting and the AC Line and the two 10AN 90 degree fittings (top and bottom) I. Install the other end of the SS Braided Hoses 45 degree Aeroquip Fittings onto the respective Oil Filter Adapter male fittings and tighten. J. Now making sure the "O" rings are in place on the Oil Cooler Adapter (I use Permatex on the adapter "O" ring face), position and the adapter on the face of the Oil Cooler and insert the 6mm x 1.0 x 35 mm SS Allen head bolt with SS washer into the Oil Cooler Adapter and tighten the bolt. No modification of the Fiberglass Radiator Housing is required since the Oil Cooler Adapter is installed on the Oil Cooler AFTER the fittings are connected and tightened on the Oil Cooler Adapter.  3. General SS Hose Assembly with Re-Usable Fittings. A. Place SS Braided hose in vice and cut SS Braided hose to length using Angle Grinder with Cut Off wheel. Angle grinder is preferred since minimal SS wires are left free of the cut. B. Make sure NO SS Braided wires enter the hose end and make sure ALL loose SS Braided wires are ground flush with end of hose. Keep the hose in the vice with about 2 inches on the free end out of the vice. (Clean the inside of the hose end Cut Off before going further with Cotton Cue Tip . C. Take the AN reusable hose fitting and unscrew the male part from the female part. The other end of the male part will have an NPT pipe thread or "O" ring seal thread size (AN) as desired. D. Take the AN reusable hose fitting female part and screw/push onto the SS Braided hose (counterclockwise) by hand pushing onto the hose as you rotate the female hose fitting counterclockwise. Aeroquip Nickel Plated Aluminum Reusable Fittings are not threaded but ARE serrated requiring a push onto the hose only. Make sure ALL SS Braids are inside the hose fitting just pushed onto the hose. E. Screw/push the AN female reusable hose fitting onto the hose fitting such that the hose is at a depth into the female fitting as defined by the lines on the female fitting surface. F. Lubricate the inside diameter of the SS Braided hose with oil through the end of the female fitting. G. Insert the male reusable hose fitting into the lubricated hose through the end of the female fitting. H. Push the male fitting into the hose as you rotate the male fitting clockwise using a cresent wrench (Box Wrench preferred). Once the threads are caught, continue rotating the male fitting into the hose untill approximately 1/16 inch space is left between the hexigon of the male fitting and female fitting. I. Install the second hydraulic reusable hose fitting on the other end of the hose as per steps 2 through 8 above. J. Last...but not least....take an air hose (Air Compressor) and blow the hose clear to make sure you have a clean assembly (if the SS Braided hose is not too long look through the hose end to end for any debree). You now have a SS Braided hydraulic hose with fittings good for maybe 2,000 psi hydraulic pressure more or less. 4. Parts Required for SS Braided Oil Cooler Lines with Re-Usable Fittings. The SS Oil Cooler Lines are very easy to make up in SS Braided hose using Aeroquip reusable fittings and SS Braided hose available from Summit Racing. The Aeroquip Fittings are Swivel so self aligning when installing. A. Use two 10 AN Stainless Steel Braided hose B. use two Aeroquip Reusable Hose Ends, 90 Degree, -10 AN Hose to Female -10 AN, Aluminum, Nickel Plated C. Use two Aeroquip Reusable Hose Ends, 45 Degree, -10 AN Hose to Female -10 AN, Aluminum, Nickel Plated D. On the Oil Filter Adapter remove the 12 AN Flare fittings Trick to Remove the 12 AN Flare Fittings and use two 10AN Flare to 3/4 inch NPT E. Oil Cooler Adapter With the secondchance design use one "O" ring on each 10 AN Flare fitting with 18x1.5 metric thread. With the Jeffvette design use one Stat-O-Seal, 5/8 in Inside Diameter, Aluminum with O-Ring on each 10 AN to 3/8" BSPP Straight Adapter. F. One 6mm x 1.0 x 35 mm SS Allen head bolt G. One 6 mm SS washer H. Two "O" rings for the Aluminum adapter manifold to oil cooler interface. The first seven items can be found at Summit Racing. Secondchance Design of Oil Cooler Adapter..................Jeffvette Design of Oil Cooler Adapter  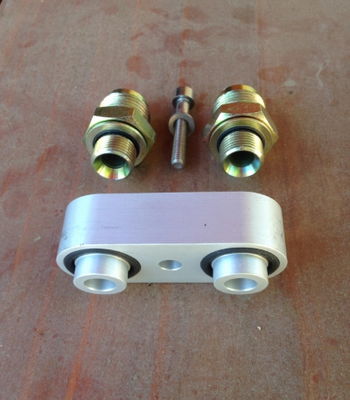 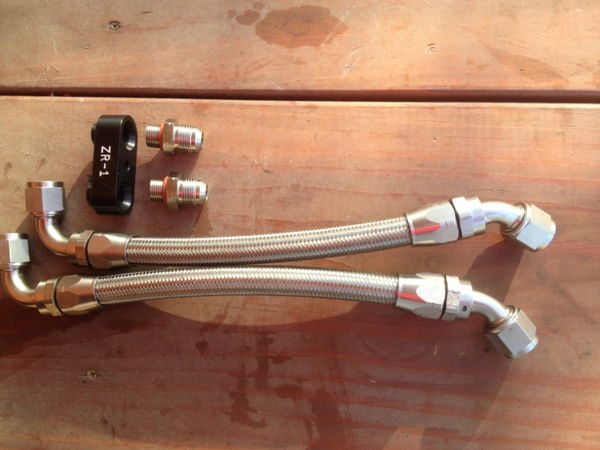 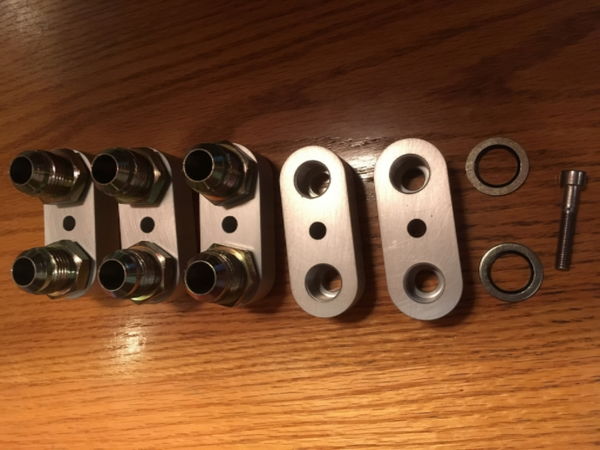 I have never had one of these hydraulic lines with Aeroquip Reusable Fittings leak and they are much much tougher than original crimped fittings and easily replaced or adjusted if you want to at some point make them longer or shorter (the fittings are reusable and swivel). And......you will find a much better routing of the lines if you make them yourself by looking at the routing of the existing Hydraulic Lines. The Aeroquip Reusable Fittings come in all sizes and angles to fit any situation. You can make your own oil cooler lines as shown here and Power Steering Lines or any other hydraulic line you might need on the ZR-1. As an aside, I use the similar Aeroquip reusable fittings and Aeroquip 1509 hydraulic hose on all my farm implements and tractors. I make up all my implement hydraulic lines often replacing relatively new lines that come with the implements with my own lines that are much more dependable under extreme usage. We are talking hydraulic pressures over 2,000 psi on the hydraulics of some of these implements when the cylinders reach the stops. Once you experiment with making your own hydraulic lines with some using SS Braided hose you will never look back at buying ready made hydraulic lines again. All you need is a vice, hand grinder (or even a hack saw will work), and a couple box wrenches of appropriate size. Oh...and an air compressor to blow clean the lines after assembly. 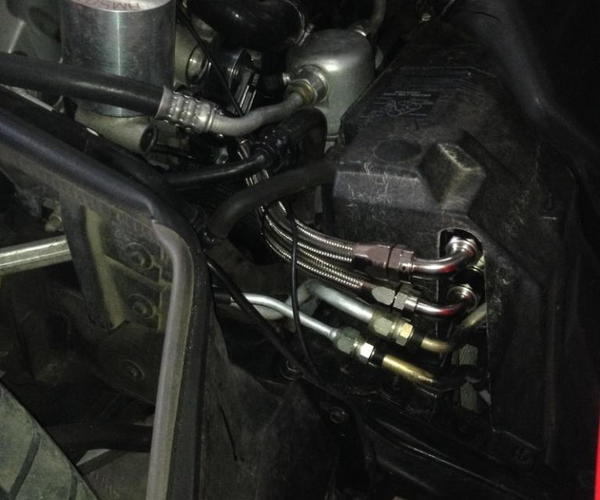 See SS Braided Oil Cooler Hoses and Fittings Last UPDATE of post 8 July, 2024 Last edited by Dynomite; 06-28-2024 at 09:39 PM. |
|
|

|
|
|
#9 |
  Join Date: Aug 2009
Location: South Dakota/California
Posts: 3,797
|
New Secondary Port Throttle Vacuum System for 1990-1995.
See.......Post 234 - Installation of New Secondary Port Vacuum System hoses This complete NEW vacuum system designed for the 93'-95' can be installed on a 1990-1995 ZR-1. For 1990-1992 this can be accomplished by substituting the longer Manifold Differential Pressure vacuum line on the original 1990-1992 ZR-1 Vacuum System for the shorter curled MDP Vacuum line in the New 93'-95' Secondary Port Throttle Vacuum System. The New vacuum system connectors are New soft rubber and easy to disconnect connectors which are very tight (just twist the plastic tube back and forth and they will let loose). The Original hard rubber connectors are impossible to disconnect without cutting the connector lengthwise (with razor blade) to remove the plastic tube.  The Tee (T) was moved and a 1 inch long 1/8" Fuel Line PCV/EEC (SAE 30R7 obtained at O'Reillys) was used as a splice where the T was located. The Stock MDP Vacuum Line was used and added to the New Secondary Vacuum System. I replaced the stock L fitting with the New L fitting removed when T was re-installed for the Drivers Side Secondary Canister. In this case I also used the Stock line with New L fitting from the check valve to the Vacuum Pump line as that Stock line was just a bit longer 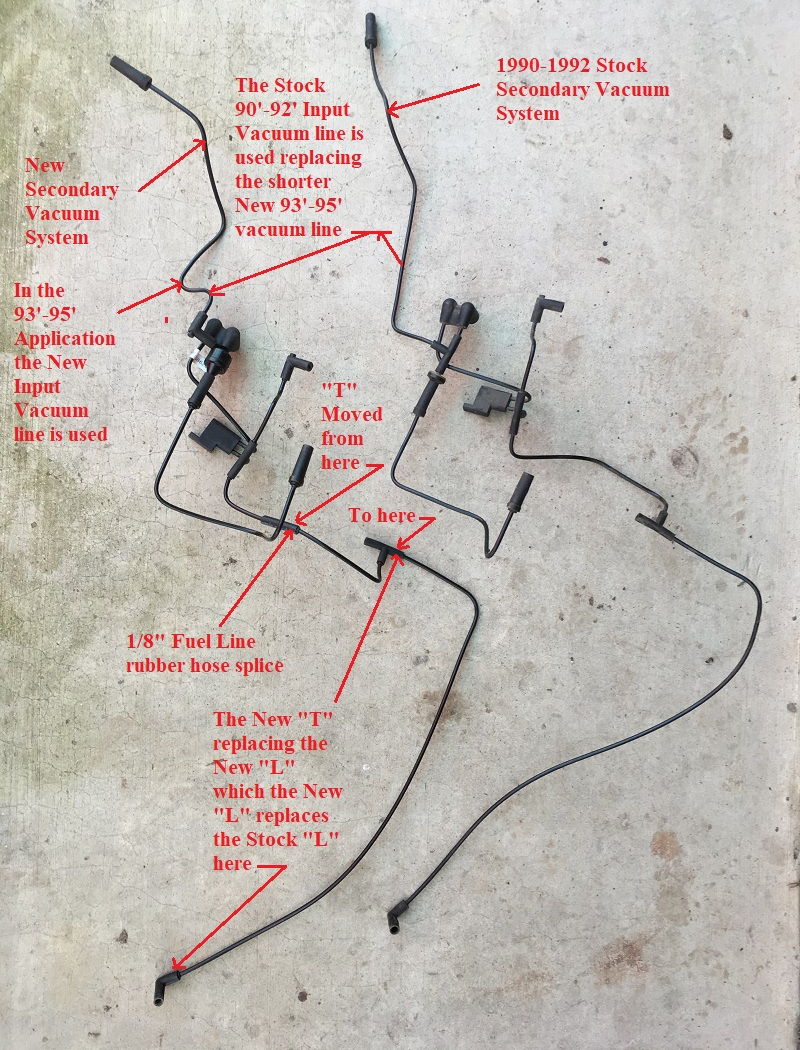 Went for a test drive with the 1990 and ALL is perfect  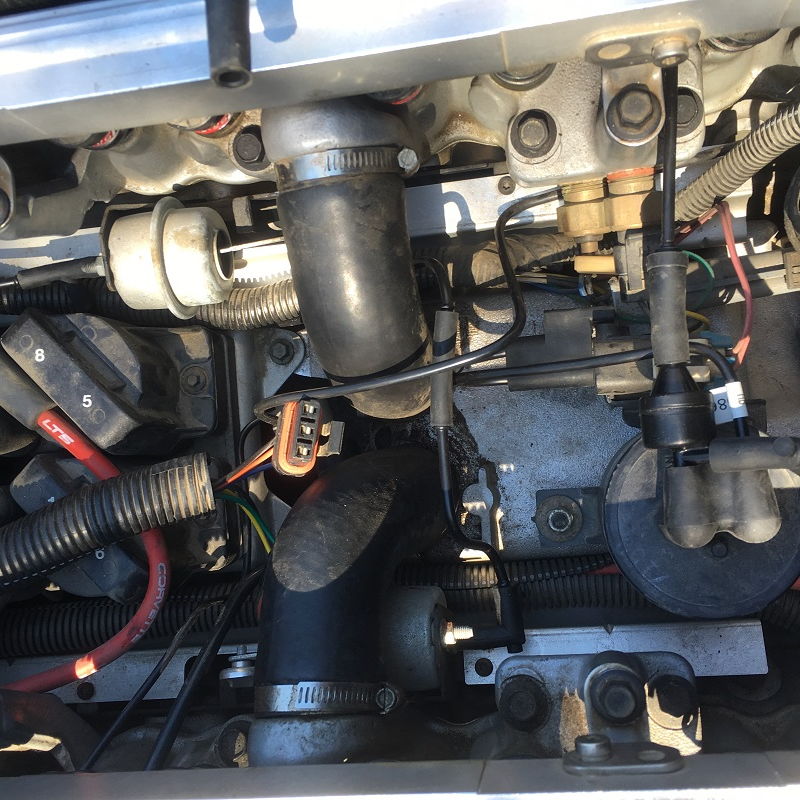 These New Secondary Vacuum Systems for 93'-95 which can easily be modified for 1990-1992s are offered on Ebay for $100 but one can buy them with an offer for less  New Secondary Vacuum System 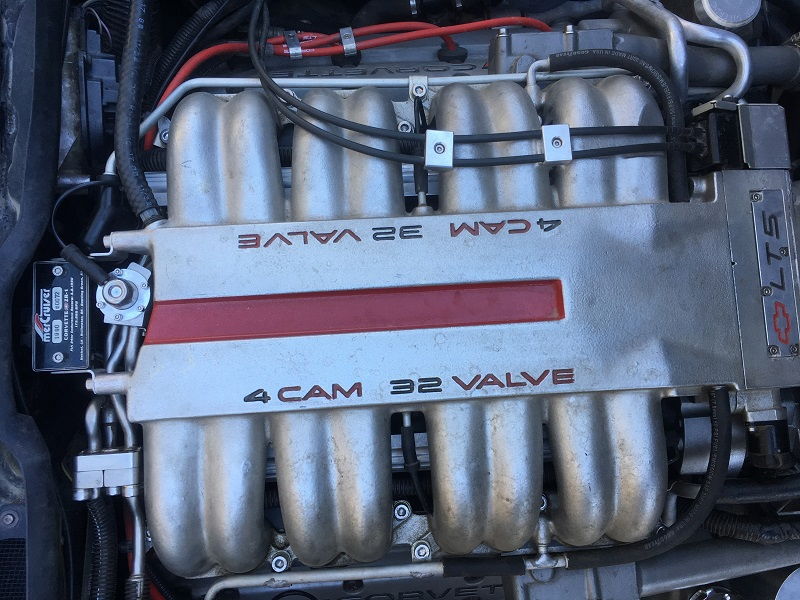 Last UPDATE of post 9 July, 2024 Last edited by Dynomite; 06-28-2024 at 09:39 PM. |
|
|

|
|
|
#10 |
  Join Date: Aug 2009
Location: South Dakota/California
Posts: 3,797
|
Phil's (Jagdpanzer) Fuel Pressure Regulator Solution
  1990 ZR-1 #72 with the IFPR  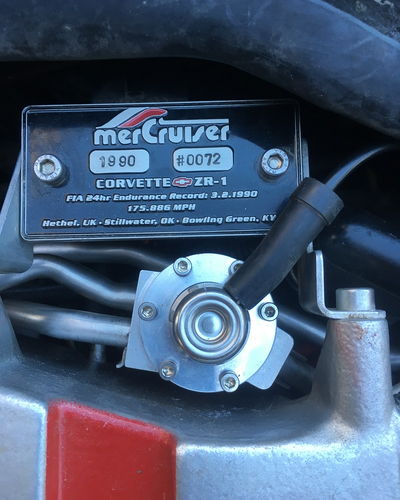 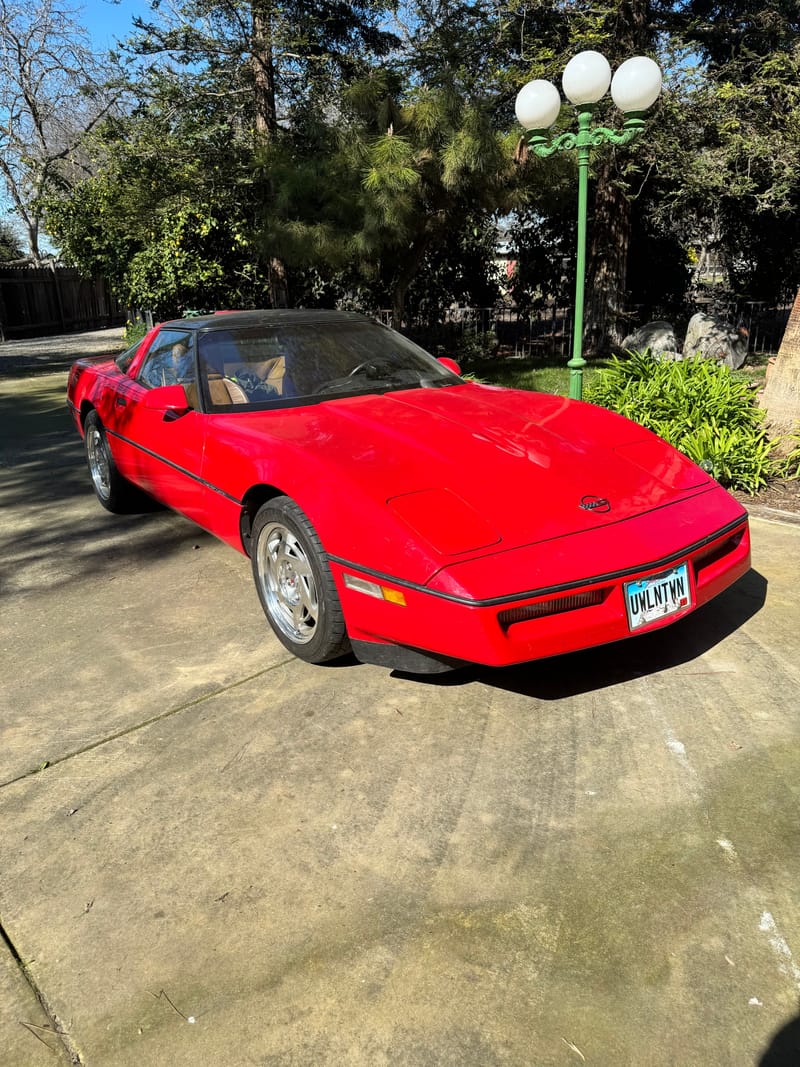 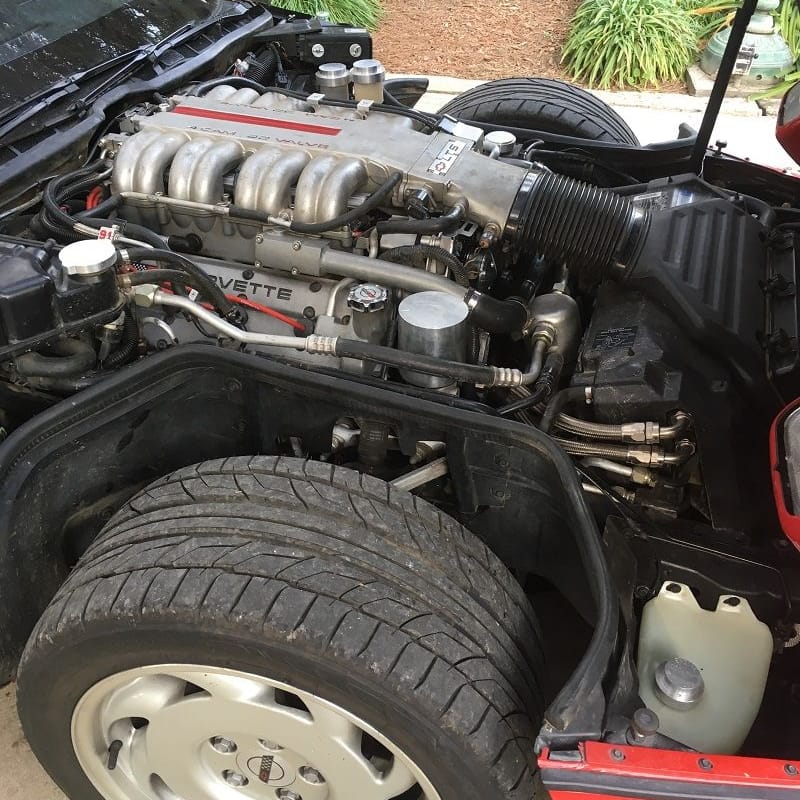 I see no issues for long term use as I have now tested three IFPR (2-1990 and 1-1995) with over 300 operating miles. It will now be so easy to change out Delphi FPR removing failed Delphi (may never fail once installed) or change out the Dephi (for higher pressure or lower pressure Dephi) from the Modified Stock FPR Housing which take only a couple minutes (release fuel pressure in Fuel Rails first). I have installed one Prototype IFPR and two Production IFPR with the same results.....NO LEAKS and PERFECT Performance under ALL Driving Conditions. The Delphi FP10016 is NOT modified in this Application......there are five items that come with the Delphi FP10016 (Plastic Adapter, Screen and snap ring with two additional sliders) that Phil does NOT use. Phil has eliminated the plastic ring, the screen and the snap ring and is using the "O" rings. See The Improved LT5 Fuel Pressure Regulator Pulling the Plenum for most is a BIG deal and most often the Plenum is Pulled to fix a No Start Situation, an Alternator or to replace Injectors. I would say if you recondition your Starter and/or install a reconditioned Alternator or New Injectors... then also install the Improved Fuel Pressure Regulator at the same time  Post 281 - The Improved LT5 Fuel Pressure Regulator Post 282 Changing Out Improved Fuel Pressure Regulator (IFPR) Last UPDATE of post 10 Feb, 2024 Last edited by Dynomite; 02-22-2024 at 10:36 PM. |
|
|

|
 |
|
|