
|
 08-28-2011
|
#1 |
|
Join Date: Aug 2010
Location: Las Vegas, NV/Toledo, Ohio
Posts: 9
|
Just replaced all primary/secondary fuel injectors in my '90 ZR1 after sitting for over 3 years. 14,500 on the clock. Oil change and sealing of the R-side header bolt. How long does it take to run the flat spots off the tires ...?
|

|

|
|
08-28-2011
|
#2 |
 Join Date: Dec 2003
Location: McHenry, Il.
Posts: 6,584
|
Welcome back!!!
I have to do the oil leak on the header hanger stud on my 92. Tired of the leak on the converter doing the smoke thing at start up after a sit of 15 or more days. Tell me how did it go for you? Did the stud come out OK so you could apply the sealant like these instructions..... On each header side is a stud located in the middle of the header, where it mates to the manifold. The stud is about a 1 1/4" long and has a nut welded on. The stud screws into the block and into one of the oil galleries. With all of the heat generated here, the stud will fail to seal and an oil leak is the result. > CORRECTION - To fix the problem, use the following procedure. > 1. Remove the front tire from the side to be fixed. > 2. Remove the rear inner wheel well. It has an assortment of Torx and hex head bolts. > 3. You will now be able to look at the headers and see the stud, situated between the first 2 and last 2 cylinders. > 4. Use a 15mm socket to remove the stud. The nut is welded on to the stud. > 5. Clean up the stud, and apply a liberal amount of high temp Red RTV to the threads. > 6. Very carefully thread the stud back into the manifold. This is the hardest part, as it is very close quarters. Don't drop the stud, or it will fall into the deep crevices of the exhaust tubes. > 7. Let the RTV set up overnight, and enjoy a leak free LT5. Or did it go like it did for Trevor in his '91 White/Red ? "These instructions are correct except for one thing. The nut is not welded to the stud (at least it wasn't on mine). When you loosen the nut, the stud may stay in place. You need to put two nuts on the stud and lock them together to remove the stud. This is easier said than done, because there isn't a lot of room to work. I never did get my stud out. I ended up cleaning it while it was still installed with brake cleaner and coating both the stud and nut with high temp sealer. No leaks for the past two years." ALSO..... The nut (at least from the factory) is not welded to the stud. Many times the stud will come out when loosening the nut, but if it doesn't you can get another M10 nut and lock against the 1st one then turning the lower nut back the stud and both nuts out. Reverse process is the best way I know of to re-install the stud, with out a stud driver.Hope this helps...Greg Van Deventer MORE INFO FROM LOCO BOB Here's a diagram of what it should look like - at least every example I've ever seen. The circles in the center are the exhaust ports, the x's are bolts/studs and the o's are empty holes. All of the cars I've worked on have had 6 of the long M8 bolts with spacers and one center stud/nut per side. 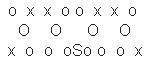
|
|
|
|
|
08-28-2011
|
#3 |
|
Join Date: Aug 2010
Location: Las Vegas, NV/Toledo, Ohio
Posts: 9
|
The stud came out along with the nut. Little bit of a challenge with the tools I had available, didn't really have the time to run to the store to get exact fit. Ended up getting it out with a Craftsman open-end/box wrench and some patience.
Very nice to no longer have the smoking and oil smell. |
|
|
|
|
08-28-2011
|
#4 |
|
Join Date: Apr 2009
Location: Prather, CA
Posts: 804
|
The nut wasn't welded to the stud on my '90 Z either. The nut however is a crimp-type nut and in my case was tight enough that the stud came out too.
Yes, these are a b*tch to remove/install. The drivers side is the hardest, as you can't get a socket on the nut on that side. I had to use an open end wrench. The wrench has almost no space to move and I had to keep reversing it to get it to fit on the nut after each tiny turn. Takes awhile but is doable. The passenger side was a lot easier since there is more room on that side, enough to get a socket on it. That stud sure makes installing the manifolds easier though (relative term with regards to that, still a b*tch Speaking of bringing ZR-1's back to life, I'm getting really close to being able to try starting my 'Z, possibly today if all goes well (we all know how that goes...). I haven't had much time to update as much as I used to, but I'll try to post one today if I can. Let's see if there is some life left in this beast... Last edited by bdw18_123; 08-28-2011 at 03:40 PM. |
|
|
|
|
08-28-2011
|
#5 | |
 Join Date: Feb 2011
Location: San Marcos CA
Posts: 1,786
|
Quote:
|
|
|
|
|
 |
|
|


 Linear Mode

