
|
|
|
 03-05-2013
|
#1 |
  Join Date: Aug 2009
Location: South Dakota/California
Posts: 3,788
|
Has anyone used an AC Vacuum pump (gauges) and oil in the case of a break in the AC connections? How do you do it?
|

|

|
|
03-06-2013
|
#2 |
 
Join Date: Jan 2009
Location: Mandeville, LA
Posts: 340
|
Cliff,
I'm not understanding your question. Are you asking how to vacuum(evacuate) the freon system prior to charging? If so, detailed instructions are available in the FSM. Pay careful attention to the type and quantities of oil. The FSM lists how much oil should be present in each of the components. There are variables depending on whether you are changing any components, but the FSM explains it pretty well. Feel free to PM me if you have any questions. I do marine AC systems on the job and do all of my own AC work on my vehicles. Jep Last edited by VetteVet; 03-06-2013 at 11:12 PM. Reason: wording |
|
|
|
|
03-06-2013
|
#3 | |
|
Join Date: Aug 2009
Location: South Dakota/California
Posts: 3,788
|
Quote:
Also there is some desiccant of sorts that has to be changed? That is what I want to do  Maybe I am smoking dope.....  But then again......I will try anything once. Darn line broke at Evaporator when I pulled the engine......I got new evaporator (I guess it is the evaporator) and now need a charge. Oh...almost forgot.... 91' ZR1 is up and running again after some "secret" changes....Extremely smooth idle and ....and...well...you know the rest of the story when it comes to a nicely tuned, ported, cammed, Open Exhaust LT5. I pulled the engine with Headers installed and put engine back in Z same way.....except for the AC issue
__________________
Left Clickable links -Solutions- LT5 Modifications/Rebuild Tricks Low Mileage ZR-1 Restoration 1990 Corvette (L98) Modifications LT5 Eliminated Systems LT5 Added Systems LT5/ZR-1 Fluids 1995 LT5 SPECIFIC TOP END REBUILD TRICKS Last edited by Dynomite; 03-07-2013 at 12:07 AM. |
|
|
|
|
|
03-07-2013
|
#4 |
|
Join Date: Jan 2009
Location: Mandeville, LA
Posts: 340
|
Cliff,
Vacuum for an hour, then shut gauge manifold valves, turn off vacuum pump and monitor vacuum in system for evidence of any leaks. If none, you're set to charge with the amount of R-12 listed in the FSM. When you connect the can, make sure that you have the can upright and then loosen the fill hose at the manifold to purge the air, then retighten it. The can has to be upright to ensure that you get vapor, not liquid. Charge to the low(suction) side with can inverted until you cannot get any more Freon to flow into the system, then return can to upright position, start engine, leave doors open, switch climate control to auto and set to lowest temp setting. If you don't have enough pressure in the system for the A/c compressor to kick on, disconnect the pressure cycling switch and jump the two wires to energize the clutch. Add remaining Freon to the low side with can in upright position. You don't want any liquid Freon hitting the compressor, as that will damage it. Remember to shut the low side valve when changing cans and also re-purge the fill line. It doesn't take very much air/moisture in the system to seriously degrade performance. The FSM lays it out very nicely. Shoot me a PM if you have any questions. Jep |
|
|
|
|
03-07-2013
|
#5 | |
|
Join Date: Aug 2009
Location: South Dakota/California
Posts: 3,788
|
Quote:
Thank you thank you I will think, study, and think some more and maybe PM you if I have questions......I am not sure about the oil yet but did not loose very much oil as my understanding most of the oil resides in the compressor. I will give it a try....and thanks again. I am sure anyone who has pulled an LT5 moving the AC compressor out of the way over to the drivers side has prolly done what I did once or twice....pulled too much on the AC line attached to the evaporator Cliff |
|
|
|
|
|
03-07-2013
|
#6 |
|
Join Date: Feb 2010
Location: Arvada Colorado
Posts: 194
|
Also If the system has been opened for any length of time, replace the accumulator/Drier to make sure you have a clean dry system. Cheap insurance as these compressors are expensive.
http://www.rockauto.com/catalog/more...995&cc=1041297
__________________
[I]4-cam[/I] [I]1991 ZR-1 Blk/Gry #31[/I] [I]SW Headers/Xpipe- Dynomax Muffs[/I] [I]Ported top end[/I] [I]Secondaries Removed[/I] Tune by Dominic |
|
|
|
|
03-07-2013
|
#7 | |
|
Join Date: Jan 2009
Location: Mandeville, LA
Posts: 340
|
Quote:
Jep |
|
|
|
|
|
03-07-2013
|
#8 | |
|
Join Date: Aug 2009
Location: South Dakota/California
Posts: 3,788
|
Quote:
 Also at Oreilly Auto Parts Murray AC Accumulator/Drier for $43 (for a 91 ZR1)  Or Eckler's Corvette has the Air Conditioning Receiver Drier for $25 plus shipping. And thanks again Jep for the technical information.....appreciate it
__________________
Left Clickable links -Solutions- LT5 Modifications/Rebuild Tricks Low Mileage ZR-1 Restoration 1990 Corvette (L98) Modifications LT5 Eliminated Systems LT5 Added Systems LT5/ZR-1 Fluids 1995 LT5 SPECIFIC TOP END REBUILD TRICKS Last edited by Dynomite; 03-07-2013 at 01:02 AM. |
|
|
|
|
|
03-11-2013
|
#9 | |||
|
Join Date: Aug 2009
Location: South Dakota/California
Posts: 3,788
|
Quote:
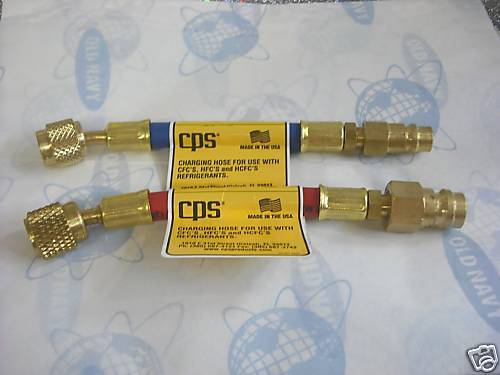
I edited this post in accordance with the information provided by VetteVet in next post VetteVet How To Evacuate and Re-Charge A/C System on C4 ZR1 just to make sure I understand. I have a vacuum pump with an R12 fittings (actually two fittings) and a set of gauges (red and blue) with R12 adapters. I also have a new Accumulator/Drier (not installed yet as I assume I do not want to expose that to air). Have a few cans of R12 and a couple cans of R12 plus oil. Vacuum the A/C System 1. The A/C connector on the passenger side with black cap (just inside of shock) is High Side. 2. The A/C connector on the Accumulator/Drier is the Low Side. 3. Connect gauges to the Vacuum Pump (yellow line center of Manifold). 4. Connect Low Side (Blue Line) to Accumulator/Drier connection. 5. Connect High Side (Red Line) to High Side connection just inside passenger wheel well (lower line on Evaporator Housing). 6. Open both High Side and Low Side Manifold Valves and turn on Vacuum Pump for 60 minutes. 7. Shut Manifold Valves (then shut OFF Vacuum Pump) and make sure Vacuum does not leak down indicating a System Leak. 8. If NO LEAKS, Install New Accumulator/Drier and repeat this process. Charge the A/C System 1. With both Manifold Valves closed, hook up a can of R12 to the yellow middle hose (see Note #1 below). 2. Turn the can valve fully counterclockwise to open the valve. 3. With the can upright, crack the fitting on the yellow hose where it attaches to the gauge manifold to purge the air out of the hose, then retighten it. 4. You can now invert the can and crack the blue Low Side valve and charge until the pressure equalizes between the can and system (no more flow is felt or heard). Never open the Red High Side valve during the Freon Charging process. 5. Now start your car and set the climate control for Max cooling with blower on high. Ensure that the compressor clutch is engaged at this point (see Note #2 below). You can now charge the remainder of the first can with can in an upright position. Always charge with can upright when compressor is running. 6. Once the first can is in, (you'll know it's all in when you can shake the can and not feel any liquid sloshing in it) you can shut the low side valve and swap to the second can. 7. Remember to purge the yellow line again prior to charging. 8. Continue this until you have added the correct amount of Freon, per the FSM. Once the sytem is fully charged, shut off the compressor and allow High Side and Low Side pressures to equalize before disconnecting the gauge manifold from the system. 9. Once the manifold is disconnected, cap the high and low side fittings, reconnect the pressure cycling switch and you're done. 2 Stage Vacuum Pump..................................................Manifold and Gauges   Adapter Connections R134a to R12.................................R12 Can Connector and Gauge   Notes: 1. Prior to connecting the valve to the freon can, unscrew the valve stem fully(you will see the needle in the valve retract up into the body). Then screw the valve onto the can. Now turn the valve fully clockwise to puncture the can. 2. If the compressor clutch is not engaged, you will have to pull the connector on the pressure cycling valve in the low side line and jumper it. The compressor clutch should now engage. 3. The better you vacuum the system, the better it will perform. You won't hurt the vacuum pump if you want to let it run for 5 hours. 4. Always purge the air from the charging(yellow) line when you connect a can of Freon. 5. When the compressor is running, always charge to the low(blue) side with can upright. 6. NEVER, EVER open the high side valve when the compressor is running. That flimsy Freon can will not contain the pressure(can you say SHRAPNEL!!!). I've never done it and don't want to try. 7. If you follow these Notes, no harm will be done. Thank you VetteVet (Jep) for the "How To" technical information including the Notes and thank you 4-cam for Accumulator/Drier replacement suggestion. Quote:
Quote:
__________________
Left Clickable links -Solutions- LT5 Modifications/Rebuild Tricks Low Mileage ZR-1 Restoration 1990 Corvette (L98) Modifications LT5 Eliminated Systems LT5 Added Systems LT5/ZR-1 Fluids 1995 LT5 SPECIFIC TOP END REBUILD TRICKS Last edited by Dynomite; 03-13-2013 at 09:24 AM. |
|||
|
|
|
|
03-12-2013
|
#10 | |
|
Join Date: Jan 2009
Location: Mandeville, LA
Posts: 340
|
Quote:
Remove caps on drier and install it just prior to vacuuming the system. The hose on the left side(blue) is low side. The hose on the right side(red) is high side. If you look at the evaporator housing, the line going into the bottom is the high pressure line. Follow that one back and you will find the high side fitting. The one on the accumulator/drier is the low side fitting. Vacuum the system with both valves open. Charge the system by opening the low side valve only. This is especially important as the pressure developed when the compressor is running will rupture the can of freon. NEVER, EVER open the high side valve with the compressor running. If you don't have one, you'll need to pick up a freon can valve from your local auto parts store. Hook up the yellow hose to the middle connection on the gauge manifold and to the vacuum pump. Vacuum the system and then shut manifold valves first, then shut off pump. Let the sytem sit long enough to ensure that vacuum is not dropping. If it is, you have to find and fix the leak(s). If not, then diconnect the hose from the pump and hook up the can valve to the yellow hose. Prior to connecting the valve to the freon can, unscrew the valve stem fully(you will see the needle in the valve retract up into the body). Then screw the valve onto the can. Now turn the valve fully clockwise to puncture the can, then turn fully counterclockwise to open the valve. With the can upright, crack the fitting on the yellow hose where it attaches to the gauge manifold to purge the air out of the hose, then retighten it. You can now invert the can and crack the blue low side valve and charge until the pressure equalizes between the can and system(no more flow is felt or heard). Now start your car and set the climate control for Max cooling with blower on high. Ensure that the compressor clutch is engaged at this point. If not, you will have to pull the connector on the pressure cycling valve in the low side line and jumper it. The compressor clutch should now engage and you can charge the remainder of the first can with it in an upright position. Always charge with can upright when compressor is running. Once the first can is in, (you'll know it's all in when you can shake the can and not feel any liquid sloshing in it) you can shut the low side valve and swap to the second can. Remember to purge the yellow line again prior to charging. Continue this until you have added the correct amount of Freon, per the FSM. Once the sytem is fully charged, shut off the compressor and allow high and low side pressures to equalize before disconnecting the gauge manifold from the system. Once the manifold is disconnected, cap the high and low side fittings, reconnect the pressure cycling switch and you're done. Jep |
|
|
|
|
 |
|
|


 Hybrid Mode
