|
|
#1 |
 Join Date: Nov 2007
Location: Squires (near Ava MO in the Mark Twain N'tl Forest) - Missouri
Posts: 6,466
|
I spent over a year getting ready to "go play" at a recent Corvette Challenge race, only to have the cabin fill with smoke on the first run
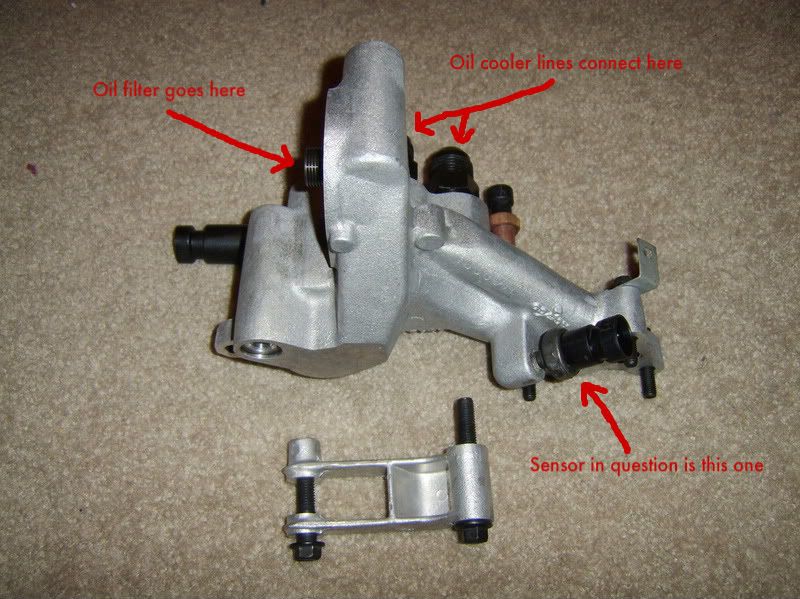
 (a couple weeks ago). (a couple weeks ago). According to the gurus, the (low) oil pressure switch - the one that is on the bottom side of the oil filter housing - has a propensity for leaking. And, it is very close to the #2 header pipe, I might add (hence the smoke!) At first I noticed an occasional whiff smell of burning oil. Then Marc Haibeck told me the car used about 3/4 quart of oil during the tuning process. This was followed by me then noticing the side of the car and passenger window covered with "freckles" of dust - which I dismissed as "musta got something sprayed on me while driving on the highway somewhere??" But, at WOT on the first pass, it blew big time! Marc and I looked for the leak while at the track, but could not see anything for sure. After I removed the side wheel panel and put a light in there was I able to see the bottom of the pressure switch had been oozing oil and everything below it was oily. After removing the right-side motor mount nut and jacking the motor on it's side (a couple inches), I could clearly see the little bastard! But, here's my point: Don't bother tying to get at the SOB directly. Take the 10-15 minutes it will require to remove the air cleaner, the belt and tensioner**, the oil cooling lines, and the 5 bolts holding the oil filter housing in place. You don't have to lift the filter housing out of the car, but you can now easily rotate it to expose the sensor. (I bought that special socket for removing such sensors, but a pair of Channel Locks would easily get to it now.) Put some sealant on the threads (I used Teflon tape) and turn it in to just snug enough to seal - "practically, just a little more than hand tight", according to Marc H. (The body of the sensor is pot metal and the threaded tip is only about 3/8" in diameter. If it snaps off, you'll have another interesting chore ahead of ya Back together now, and all is well...No more "freckles" P. **PS: If you've never removed the belt tensioner before, you might want to scratch or paint a line across the joint between the tensioner and the engine so you can align it properly on reassembly. Otherwise, it is possible to have it turned too far (clockwise) upon tightening and you'll not be able to get the belt on...trust me. Last edited by Paul Workman; 11-15-2010 at 06:18 AM. |
|
|

|
|
|
#2 | |
 Join Date: Jul 2007
Location: Bartlett, IL
Posts: 7,156
|
Quote:
__________________
1990 Corvette ZR-1 #1051 Watson Headers (2" Primary) - Flowmaster Cats - Borla Catback Late Model IH - Plenum Coilovers - 4.10s Shelby Series 1 - Wilwood Brakes Custom Interior NCM Lifetime Member #978 |
|
|
|

|
|
|
#3 | |
 Join Date: Nov 2007
Location: Squires (near Ava MO in the Mark Twain N'tl Forest) - Missouri
Posts: 6,466
|
Quote:
I'll try to get my download to work and send a pic later today P. |
|
|
|

|
|
|
#4 |
|
Join Date: Jun 2010
Location: Lone Pine, CA
Posts: 580
|
is the sensor on the oilfilter housing.
|
|
|

|
|
|
#5 |
  Join Date: Apr 2007
Location: Northern VA
Posts: 2,646
|
Sorry guys, still not clear to me.
How about circling it to remove my confusion? |
|
|

|
|
|
#6 | |
 Join Date: Nov 2007
Location: Squires (near Ava MO in the Mark Twain N'tl Forest) - Missouri
Posts: 6,466
|
Quote:
P. |
|
|
|

|
|
|
#7 |
  Join Date: Apr 2007
Location: Northern VA
Posts: 2,646
|
Here is a better view of it

|
|
|

|
|
|
#8 |
 Join Date: Nov 2007
Location: Squires (near Ava MO in the Mark Twain N'tl Forest) - Missouri
Posts: 6,466
|
|
|
|

|
|
|
#9 | |
|
Join Date: Apr 2009
Location: Prather, CA
Posts: 804
|
Quote:

|
|
|
|

|
|
|
#10 |
|
Join Date: Jul 2009
Location: Redding Calif
Posts: 223
|
P.
**PS: If you've never removed the belt tensioner before, you might want to scratch or paint a line across the joint between the tensioner and the engine so you can align it properly on reassembly. Otherwise, it is possible to have it turned too far (clockwise) upon tightening and you'll not be able to get the belt on...trust me. Thanks Paul.......I wonder if that was my problem when I R&R'ed the tensioner and belt last year. I didn't mark the old tensioner as to its orientation to the block. In putting on the new one I could see that it could be installed wrong....even though it had a '' mounting tab'' on the back of it. I emailed Marc but he didn't think it would be possible as he never had a problem. The problem is that I"m a lot stupider than Marc and I had a hell of a time getting the belt over the last pully. I wrote it off as a ''tight belt'' . I hope I haven't screwed it up as it has been on the car that way for about a year now. 
|
|
|

|
 |
|
|