
|
 07-31-2010
|
#1 |
 Join Date: Mar 2007
Location: Crystal Lake, IL
Posts: 7,194
|
Can I use lock washers on these or will that pull the threads out?
__________________
LGAFF 90 #966-150K miles-sold 92 #234-sold 1987 Callaway TT #17 1991 ZR-1 #1359 |

|

|
|
07-31-2010
|
#2 |
  Join Date: May 2007
Location: Peoria, AZ
Posts: 9,154
|
I used those anti vibration header bolts, Percy split locks
__________________
GOLDCYLON - 91 ZR-1 #2014 GOLDCYLON - 90 ZR-1 #2794, 4L60e (Formerly Schrade's) GOLDCYLON - 11 CTS-V Arizona State Director  91 WHITE/BLACK #2014. 380 P&P&PCed,Ported Heads, Jeal Long tubes, Corsa Exhaust/FIKSE FM-5s /LED TLs, LED Headlights, Front Wilwood 6 piston narrowlite calipers and rear Wilwood caliper street shop mod,CNCed Coolant Pipes,TPI Cvr,Filter cover,Stainless Bolts, DRM/DOM PROM /ZFDOC mod build #102,DRLs,BMAD with stainless Debris Screen,Coplan Air Blaster, Pioneer APP Radio 4,Brey-Krause HB,Sub Bar,Fire extinguisher seat mount,DRM Coilovers,LEDs everywhere,Compass mirror (orange),V1 DIC hidden display, Homelink sun visor, Carbon Fiber top x3 and APSIS Carbon Fiber interior, APSIS CF Steering Wheel/NAPA Leather, Banski trailing arms, Guldstrand front suspension,urethane bushings from Prothane (total suspension) ZFDoc drive shaft safety loop, raptor shift light (orange),AO engineering louver front plate, Console seat cushion, 96CE seats with black custom Sheepskins, ss billet catch can,Viper remote entry/alarm,Cragar Rear Louvers,LED side louver lights, Dewitts Radiator with SPAL fans and a Woods 160 T-Stat 90 RED/BLACK #2794. 4L60e Automatic Stage V by RPM Transmission, TCI Dedicated TCM, OBX Stainless Headers, Corsa Exhaust, SAN Secondaries and Haibeck PROM, Exotic Muscle Coil overs, LED Interior Lights, LED Tail Lights, LED Headlights, 94 Sport seats with black custom Sheepskins , Cragar rear louvers, GS Front calipers, Banski Trailing arms, APSIS Carbon Fiber steering wheel, Front and Rear Baer Eradispeeds, DRLs, Guldstrand front suspension,urethane bushings from Prothane (total suspension), Dewitt's Raditor with Dual SPAL fans and a Haibeck 170 T-Stat 11 RED/GREY CTS-V Last edited by GOLDCYLON; 07-31-2010 at 11:01 PM. |
|
|
|
|
08-01-2010
|
#3 |
|
Join Date: Apr 2007
Location: Northern VA
Posts: 2,651
|
Regular lock washers tend to loose their spring tension after being exposed to high temperatures for a while. Then they do you as much good as a regular flat washer.
I used the Stage 8 LT5 header bolt kit PN STG-8909 ordered from Summit. 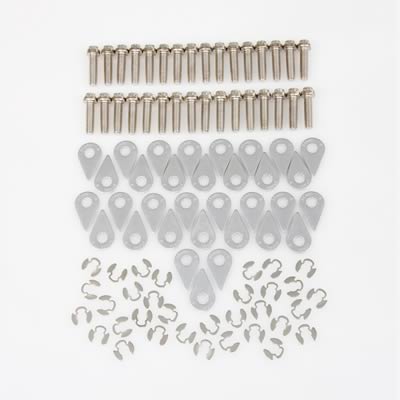 http://www.summitracing.com/parts/STG-8908/ These are good quality nickel plated steel bolts with 8 mm 12 point heads and are 30 mm long. The small head makes wrenching the ones with tight access a lot easier. However, I did not use the locking tabs that came with them, as they looked to be more trouble to install than I was prepared for. After two years all 28 bolts are still tight. Be sure to start all bolts a couple threads at first then continue making the rounds of drawing up each bolt a few turns at a time until all are tightened. Last edited by Jagdpanzer; 08-01-2010 at 06:30 PM. |
|
|
|
|
08-01-2010
|
#4 |
|
Join Date: Mar 2007
Location: Crystal Lake, IL
Posts: 7,194
|
Looks like I will need:
-O2 extensions -New bolts for Center Studs, the 2" doesn't want to let the the stud clear -2 Reducers: 1 dome/1 3-2.5" reducer **Anyone hace Corsa system with headers????? any suggestions
__________________
LGAFF 90 #966-150K miles-sold 92 #234-sold 1987 Callaway TT #17 1991 ZR-1 #1359 |
|
|
|
|
08-01-2010
|
#5 |
|
Join Date: Apr 2007
Location: Northern VA
Posts: 2,651
|
Lee,
I posted this up a while back: http://www.zr1.net/forum/showpost.ph...3&postcount=29 In my case I only needed O2 extension on the passenger side. I have an extra extension laying around somewhere which you are welcome to provided I can find it. Phil |
|
|
|
|
08-01-2010
|
#6 |
|
Join Date: Mar 2007
Location: Crystal Lake, IL
Posts: 7,194
|
I only need 1 also, typo on post.
__________________
LGAFF 90 #966-150K miles-sold 92 #234-sold 1987 Callaway TT #17 1991 ZR-1 #1359 |
|
|
|
|
08-01-2010
|
#7 |
 Join Date: Dec 2003
Location: McHenry, Il.
Posts: 6,607
|
LG were you aware about this problem?
I have to fix this on mine 92 some day. PROBLEM - It has been well documented that the LT5 commonly leaks oil out of the header studs side, and leaks down on the cat. If it sits around a couple of weeks, it would smoke badly after about 5 minutes of warm up. On each header side is a stud located in the middle of the header, where it mates to the manifold. The stud is about a 1 1/4" long and has a nut welded on. The stud screws into the block and into one of the oil galleries. With all of the heat generated here, the stud will fail to seal and an oil leak is the result. CORRECTION - To fix the problem, use the following procedure. 1. Remove the front tire from the side to be fixed. 2. Remove the rear inner wheel well. It has an assortment of Torx and hex head bolts. 3. You will now be able to look at the headers and see the stud, situated between the first 2 and last 2 cylinders. 4. Use a 15mm socket to remove the stud. The nut is welded on to the stud. 5. Clean up the stud, and apply a liberal amount of high temp Red RTV to the threads. 6. Very carefully thread the stud back into the manifold. This is the hardest part, as it is very close quarters. Don't drop the stud, or it will fall into the deep crevices of the exhaust tubes. 7. Let the RTV set up overnight, and enjoy a leak free LT5. 8. As long as you have the wheel well out, you might as well clean the air bag crash sensor, located on the frame rail. The right side one gets a lot of AC runoff, which corrodes the grounding. Disconnect the battery ground before removing the sensor. The sensor has 2 different bolts securing it. (13mm and 10mm I think). Once removed, you can clean up the surface and apply some dielectric grease to the surface to keep the water out. The main grounding comes from the bolts, so make sure they're clean. Hi Bryan, the nut (at least from the factory) is not welded to the stud.Many times the stud will come out when loosening the nut, but if it doesn't you can get another M10 nut and lock against the 1st one then turning the lower nut back the stud and both nuts out.Reverse process is the best way I know of to re-install the stud, with out astud driver.Hope this helps...Greg Van Deventer Bryan, These instructions are correct except for one thing. The nut is not welded to the stud (at least it wasn't on mine). When you loosen the nut, the stud may stay in place. You need to put two nuts on the stud and lock them together to remove the stud. This is easier said than done, because there isn't a lot of room to work. I never did get my stud out. I ended up cleaning it while it was still installed with brake cleaner and coating both the stud and nut with high temp sealer. No leaks for the past two years. Trevor '91 White/Red DEAR MR LOCO BOB, COULD YOU PLEASE INDICATE TO ME THE LOCATION OF THE LEAKY STUD IN YOUR NICE CHART. I HAVE COPIED THE POST OF MY LEAK PROBLEM AND WAS WONDERING WHICH POSITION IS THE FAMOUS STUD IS AT Here you go Bryan, check the chart again. The stud is now indicated with a capital S. Robert Here's a diagram of what it should look like - at least every example I've ever seen. The circles in the center are the exhaust ports, the x's are bolts/studs and the o's are empty holes. All of the cars I've worked on have had 6 of the long M8 bolts with spacers and one center stud/nut per side. o x x o o x x o O O O O x o o oSo o o x
__________________
http://i119.photobucket.com/albums/o...9mcw/SIG-2.jpg http://i119.photobucket.com/albums/o128/wb9mcw/vcm.gif "The Budget should be balanced, the Treasury should be refilled, public debt should be reduced, the arrogance of officialdom should be tempered and controlled, and the assistance to foreign lands should be curtailed, lest Rome will become bankrupt. People must again learn to work instead of living on public assistance." - Cicero, 55 BC " We the people are the rightful masters of both Congress and the courts, not to overthrow the Constitution but to overthrow the men who pervert the Constitution." - Abraham Lincoln |
|
|
|
|
08-02-2010
|
#8 | |
 Join Date: Nov 2007
Location: Squires (near Ava MO in the Mark Twain N'tl Forest) - Missouri
Posts: 6,493
|
Quote:
P.
__________________
Good carz, good food, good friendz = the best of timez! 90 #1202 "FBI" top end ported & relieved Cam timing by "Pete the Greek" Sans secondaries Chip & dyno tuning by Haibeck Automotive SW headers, X-pipe, MF muffs Former Secretary, ZR-1 Net Registry |
|
|
|
|
|
08-02-2010
|
#9 | |

Join Date: Nov 2008
Location: Grand Rapids, MI
Posts: 384
|
Quote:

|
|
|
|
|
|
08-02-2010
|
#10 | |
|
Join Date: Apr 2007
Location: Northern VA
Posts: 2,651
|
Quote:
I use the existing brackets and spring hangers from the stock exhaust at both the tranmission and differential loctations. As can be seen in the following photos the Corsa exhaust system has tabs to bolt to in the same locations as the factory exhaust.  
|
|
|
|
|
 |
|
|


 Linear Mode

