|
|
#261 |
|
Join Date: May 2007
Location: Chicagoland, IL
Posts: 9,685
|
I left the actuators on and used tie wraps. Worked just fine for months.
|
|
|

|
|
|
#262 |
 Join Date: Nov 2007
Location: Squires (near Ava MO in the Mark Twain N'tl Forest) - Missouri
Posts: 6,466
|
Uhhhhh.... Well... I don't know that I'd ever brush a gasket with a wire brush before reinstalling it; wiping it clean with brake cleaner on a rag, tho perhaps.
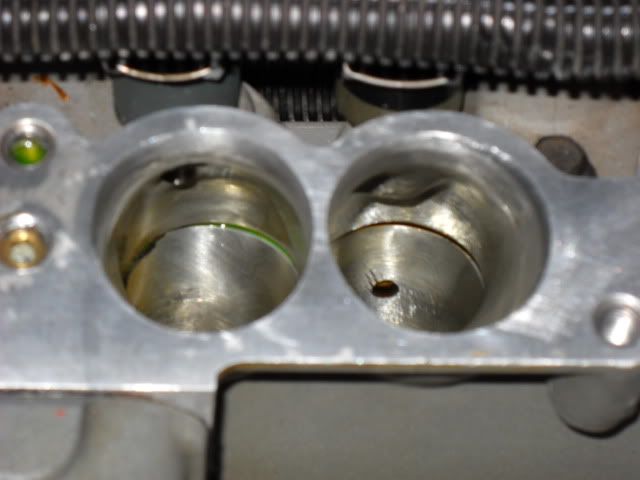
I DO spray one side of the gasket (the top side) with silicon spray as a release agent to facilitate future removals w/o damaging the gasket. I don't know that I'd use grease, but for sure you want the gasket to stay put, i.e., not squirm around, especially near coolant passages. I've experience a few gaskets that slid around, e.g., this one was actually the IH/head gasket. Note the gasket has squeezed into the runner, and the coolant too. (This can be a problem with ported runners especially, as the space between coolant and the runner gets narrow.)  This happened within weeks of installation on a couple occasions (note the runners are significantly ported). I had been smearing a film of RTV on the gaskets - thinking that would "help". NOT! I switched to Jerry's gaskets, and it was he (as I recall, Jerry?) that suggested than the gaskets be applied dry (read: NO RTV, etc to "help"). Now (especially with ported top end) I take great pains to get the metal surfaces absolutely dry and clean with (CRC - red can) brake cleaner and a razor blade, before installing (Jerry's gaskets) dry, except on the IH around the coolant port. There, around the coolant port only, I use some Permatex sealer (I forget the exact part number, but it is opaque, powder blue colored, bonds like glue and seals as well). That seems to have done the trick! Well, you may get away with it (greasing the gasket(s)). But, if you develop a high idle later, you'll have a pretty good idea where to start looking. Don't forget the BLUE LOCTITE on the threads before torquing the plenum/IH. Last edited by Paul Workman; 11-18-2013 at 05:34 AM. |
|
|

|
|
|
#263 | |
  Join Date: Aug 2009
Location: South Dakota/California
Posts: 3,815
|
Quote:
 Clean, dry bolts with a couple drops of blue Loctite on bottom threads of bolts (Injector Housing) and thin coat of Permatex on gaskets (except when I have a gasket NOT exposed to coolant in which case NOTHING on gasket). Red Loctite on everything inside the Front Cover. Blue Loctite on Oil Pan Bolts. Nothing on Head Gasket and nothing on Plenum gasket since I have TB/Plenum coolant locked. Actually I do not use any Loctite on my SS Allen Head Bolts (Cam Covers or Plenum). I use Aluminum Stat-O-Seal Washers on all Allen Head SS Steel Bolts installed in the Plenum and Cam Covers (including the IH Coolant Manifolds). Aluminum Stat-O-Seal washers with molded Buna-N inner seals are much more reliable than the more common steel stat-o-seals. If the rubber portion fails to make contact all around the port, the aluminum will act as a crush washer, providing a reliable metal to metal seal. Use them to seal screws, bolts or plumbing fittings. The Buna-N seal is resistant to petroleum fuels and oils. 
__________________
Clickable links On Iphone Touchable Links -Solutions- LT5 Modifications/Rebuild Tricks Low Mileage ZR-1 Restoration 1990 Corvette (L98) Modifications LT5 Eliminated Systems LT5 Added Systems LT5/ZR-1 Fluids 1995 LT5 SPECIFIC TOP END REBUILD TRICKS Last edited by Dynomite; 11-18-2013 at 03:11 PM. |
|
|
|

|
|
|
#264 |
|
Join Date: May 2007
Location: Chicagoland, IL
Posts: 9,685
|
Why not just get a cover from Lgaff?
|
|
|

|
|
|
#265 |
|
Join Date: Dec 2012
Location: NC
Posts: 1,783
|
Memory / Calibration Module to Marc... (and maybe it WILL get there quicker

|
|
|

|
|
|
#266 |
|
Join Date: Dec 2012
Location: NC
Posts: 1,783
|
Any tricks to getting on a new UN-stretched serpentine belt? This Dayco is a bear here...
|
|
|

|
|
|
#267 | |
  Join Date: Aug 2009
Location: South Dakota/California
Posts: 3,815
|
Quote:
 Then....having someone hold the tensioner open.....slip belt under water pump pulley (the back side of the belt) onto the smooth surface of the water pump pulley. Actually I have an aluminum Water Pump pulley with NO lip. For your stock situation maybe the alternator is the final pulley. Last edited by Dynomite; 11-18-2013 at 04:24 PM. |
|
|
|

|
|
|
#268 | |
|
Join Date: Dec 2012
Location: NC
Posts: 1,783
|
Quote:
What IS spec length? Advance's database has some L98 parts indexed as LT5... ed.: Dayco web info shows correct This product is a fit for your: 1990 Chevrolet Corvette ZR-1 5.7L MFI DOHC 8cyl Part Number: 5060805 Warranty: 3 YR |
|
|
|

|
|
|
#269 |
  Join Date: Aug 2009
Location: South Dakota/California
Posts: 3,815
|
That I am not sure on the length.......as I have several different lengths having installed different alternator, Power steering, and Water Pump pulleys from time to time. You should be able to get the belt started around the alternator pulley....it might be tight but slip it over one groove at a time.
|
|
|

|
|
|
#270 |
 Join Date: Dec 2012
Location: Ponoka, Alberta, Canada
Posts: 158
|
Schrade; With all the work you have done to date, why not get your intake ported, You have already eliminated the secondaries, Give Lgaff a shout and get your plenum ported, He does Great work....
In for a penny.... in for a Pound.... |
|
|

|
 |
|
|