
|
 10-30-2016
|
#11 |
  Join Date: Aug 2009
Location: South Dakota/California
Posts: 3,807
|
I went to The OPRV cover plate from under car after removing motor mount strut that takes no load from motor. Yes......take photos and describe your methods here
 Oh......I got 6mm x 16mm flange bolts with 10mm heads to replace the 6mm bolts with 8mm heads (lots easier to tighten). Sent from my iPhone using ZR-1 Net Registry
__________________
Left Clickable links -Solutions- LT5 Modifications/Rebuild Tricks Low Mileage ZR-1 Restoration 1990 Corvette (L98) Modifications LT5 Eliminated Systems LT5 Added Systems LT5/ZR-1 Fluids 1995 LT5 SPECIFIC TOP END REBUILD TRICKS Last edited by Dynomite; 10-30-2016 at 05:08 PM. |

|

|
|
10-30-2016
|
#12 | |
|
Join Date: Jun 2013
Location: Toronto
Posts: 780
|
Quote:
 egr is disabled in the time so I would imagine unplugging it shouldn't light up any codes ?! egr is disabled in the time so I would imagine unplugging it shouldn't light up any codes ?!
|
|
|
|
|
|
10-30-2016
|
#13 |
|
Join Date: Jun 2013
Location: Toronto
Posts: 780
|
Well, managed to get to it from above. I also removed the EGR VALVE, as well as the bracket. All together maybe 7-8 lbs of savings
the egr bracket is iron and heavy. I'll toss it on a scale later. After pulling everything .. I looked from a different angle and realized i may not have even needed to remove the egr bracket from the block.. but regardless it opened up room to get a wrachet and my hand in there to easily pull the 2 8mm bolts out turn by turn and thread lock them and tighten them back up. I did have a slight drip and under my pan I did see what was described in the original post of oil on the pan and in a wavy pattern. I'm not sure if it was coming from here.. the bolts weren't loose but I'll clean up the pan etc and check again tomorrow. Pic showing the egr valve. Taken from passenger side near the corner of the radiator shroud looking down under the passenger side valve cover.  Egr valve out  Egr bracket out. 
|
|
|
|
|
10-30-2016
|
#14 | |
|
Join Date: Jun 2013
Location: Toronto
Posts: 780
|
Quote:
|
|
|
|
|
|
10-31-2016
|
#15 |
|
Join Date: Jun 2013
Location: Toronto
Posts: 780
|
Pretty sure this is it . Short video showing its location
https://youtu.be/uQkQAuBtylo That the one dynomite? Looks like 8mm bolts Saved 4.5lbs too  Pretty sure that was the right cover.. the lower bolt was not even tight and hand loosened . The top was just barely snug. Cleaned the bolts and red loc-tite on both and retightened them. All done from above
Last edited by 5ABI VT; 10-31-2016 at 04:45 PM. |
|
|
|
|
10-31-2016
|
#16 | |
|
Join Date: Aug 2009
Location: South Dakota/California
Posts: 3,807
|
Quote:
 This is the Oil Pressure Regulating Valve Cover near bottom front passenger side of Engine. 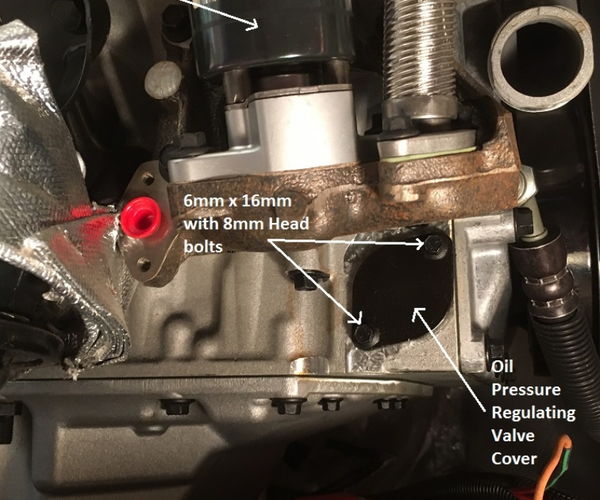
__________________
Left Clickable links -Solutions- LT5 Modifications/Rebuild Tricks Low Mileage ZR-1 Restoration 1990 Corvette (L98) Modifications LT5 Eliminated Systems LT5 Added Systems LT5/ZR-1 Fluids 1995 LT5 SPECIFIC TOP END REBUILD TRICKS Last edited by Dynomite; 02-07-2019 at 01:10 PM. |
|
|
|
|
|
10-31-2016
|
#17 | |
|
Join Date: Jun 2013
Location: Toronto
Posts: 780
|
Quote:
|
|
|
|
|
|
12-11-2018
|
#18 |
|
Join Date: Dec 2018
Location: ALLEN
Posts: 10
|
On my 1990, took the inner fender liner out to be able to see it. Then I used vice grips to extend my 1/4 inch socket with an 8mm socket on it. See the pic below.
Tightened these two plus the the drain pan bolts (removed the frame supports and heat shields) and will see overnight if this was enough. I'm getting teaspoons of oil each night on the garage floor. Last edited by dcarroll95; 12-11-2018 at 06:49 PM. |
|
|
|
|
12-12-2018
|
#19 | |
|
Join Date: Aug 2009
Location: South Dakota/California
Posts: 3,807
|
Quote:
Welcome to the Registry  What you tightened is the passenger side chain tensioner bolts (not the Oil Pressure regulating valve cover bolts). If you still have a leak...….check the Oil Pressure Regulating Valve Cover. Post 249 - Oil Pressure Regulating Valve Cover Plate See Also...……. Potential Oil Leaks and the OPRV Cover Plate I replace both top and bottom 6mm bolts with 6mm x 16mm Flange Bolts that have a 10mm head for a 10mm Box or ratchet Box wrench. It is a lot easier to tighten a 10mm bolt than an 8mm bolt which sometimes strips in the small 8mm box wrench. I used Red Loctite on the 6mm x 16mm Flange Bolts. No need to remove the Oil Pressure Valve Cover Plate or associated gasket. Two 6mm x 16mm Flange Bolts installed in Oil Pressure Regulator Valve Cover (10mm Heads) replacing original 6mm x 16mm (8mm Heads) Bolts. Top 6mm Bolt shown before tightening with 10mm Box Wrench 
__________________
Left Clickable links -Solutions- LT5 Modifications/Rebuild Tricks Low Mileage ZR-1 Restoration 1990 Corvette (L98) Modifications LT5 Eliminated Systems LT5 Added Systems LT5/ZR-1 Fluids 1995 LT5 SPECIFIC TOP END REBUILD TRICKS Last edited by Dynomite; 02-07-2019 at 01:05 PM. |
|
|
|
|
|
12-12-2018
|
#20 |
|
Join Date: Dec 2018
Location: ALLEN
Posts: 10
|
Thank you! Now I see it just in front of the oil pan front bolts. What a nightmare, but I was able to tighten them and they were each about 1/2 turn loose and leaking plenty right there. Lifted the engine as much as it would go and pulled the passenger side engine strut loose as suggested to get to it from the bottom. Didn't drip overnight but would have eventually so you saved me lots of time!
Thank you - great write up and pictures. |
|
|
|
 |
|
|


 Linear Mode

