|
|
#1 |
|
Join Date: Aug 2008
Location: Houston 90 Red ZR-1
Posts: 2,320
|
I had told somebody on this site that I would post pictures of me removing and installing a new clutch when my throw out bearing broke clean off close to a year ago. Since I'm only allowed to post no more than 6 pics at a time here I'll just post the link to them. And maybe it will help somebody in the future. http://www.corvetteactioncenter.com/...lutch-job.html

|
|
|

|
|
|
#2 |
|
Guest
Posts: n/a
|
Well, this picture very helpful, what that part laying there??

|

|
|
|
#3 |
|
Join Date: Aug 2008
Location: Houston 90 Red ZR-1
Posts: 2,320
|
|
|
|

|
|
|
#4 |
 Join Date: Jul 2004
Location: Sudbury, Ontario. Canada
Posts: 1,538
|
Nice set of pictures, looking forward to you completing the full write up mentioned.
Thanks for the resource  Dave
__________________
1991 #1516 Black/Black davidmkelly.com "Speed is often confused with insight." - Johan Cruijff Last edited by DaveK; 11-28-2008 at 02:57 PM. |
|
|

|
|
|
#5 |
|
Join Date: Aug 2008
Location: Houston 90 Red ZR-1
Posts: 2,320
|
I know. I've been lagging on doing that. Its been so long I nearly forgot about it. I don't really visit the action center very much anymore. Not much really goes on there.
|
|
|

|
|
|
#6 | |
|
Join Date: Apr 2006
Location: Ideho
Posts: 2,653
|
Quote:
If you've gone to the trouble of a write up with pics, you might think about sending it to Dwight for the HOTB. He needs articles and this would be a great one to include.
__________________
[I][FONT=Comic Sans MS]John Boyd[/FONT][/I] [I][FONT=Comic Sans MS][SIZE=1]Ideho[/SIZE][/FONT][/I] [FONT=Comic Sans MS][SIZE=1][I]2015 ZL1 [/I][I]Camaro #1121 BLACK/BLACK 6 SPD (540 RWHP)[/I][/SIZE][/FONT] [I][FONT=Comic Sans MS][SIZE=1]1991 ZR-1 #458 [COLOR=red]RED/[/COLOR][COLOR=black]BLACK 72[/COLOR]k miles ([B][COLOR=red]SOLD[/COLOR][/B]) 1991 ZR-1 #473 [COLOR=red]RED/[/COLOR][COLOR=black]BLACK [/COLOR]37k miles ([B][COLOR=red]SOLD[/COLOR][/B])[/SIZE][/FONT][/I] |
|
|
|

|
|
|
#7 |
|
Join Date: Aug 2008
Location: Houston 90 Red ZR-1
Posts: 2,320
|
You guys have inspired me to go ahead and complete the write up. Those pictures only cover a portion of the job. It doesn't cover me having to remove the C-beam bolts(which are a freaken pain in the azz because you can't even get your hands up between the tunnel and the C-beam to even touch or see the nuts) And I will cover how I did that in the write up. And the neat little trick you can use to guide the pilot bushing in the hole straight every time. And control how deep it goes. Its a big big job and takes about 18 hours. That is if you do it by yourself like I did. USAFPILOT came over to help me lift and line up the spline/transmission with the pilot bushing which only took 20 minute. But the rest was just me by my lonesome with my little garage radio listening to classic rock. You wouldn't believe how many times I heard Led Zepplin in that 18 hour period. Enough for a lifetime.
|
|
|

|
|
|
#8 |
 Join Date: Dec 2003
Location: Arcadia,OK
Posts: 3,394
|
Good Job! Right on about how heavy the tranny is. Definitely easier & safer with 2 guys for R&R. It's also a good time to make sure the valley drain tube is not plugged and to replace the rear seal if there's any leakage.
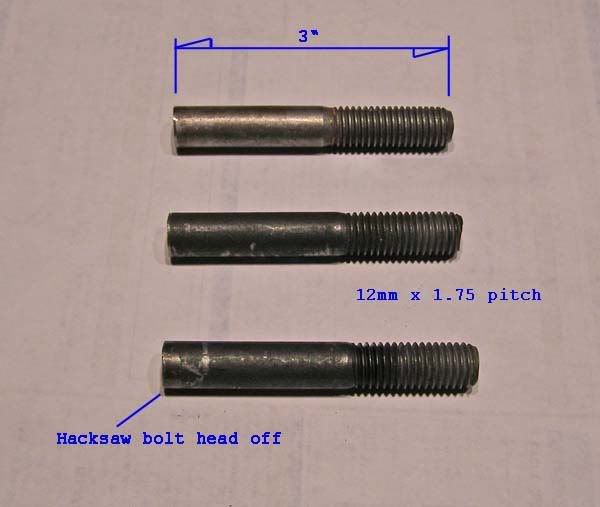
Here's a simple tool I made from bolts to help align the trans during install to avoid ever letting the weight of the trans rest on the clutch disk which can warp the disc. Just screw them into the bellhousing, a couple in the top holes and another on the side or bottom, just enough to have full thread engagement in the bellhousing. Slide the trans in & install one bolt just snug to hold it in place then use your fingers to remove the alignment studs.  ZFDoc's C-beam plates solve a couple of issues very nicely, including making the C-beam nuts a breeze. Our Prez, Ron Kreigh sells them.
__________________
Jerry Downey JERRYS LT5 GASKETS & PARTS http://www.jerrysgaskets.com 1994 ZR-1, Black/Black, Lingenfelter Aerobody, 416cu in, 3.91 gears, coil-over susp, Brembo brakes, etc. 2016 Black-Red, 3LT-Z51 Auto 8-speed. |
|
|

|
|
|
#9 | |
 Join Date: May 2008
Location: Mauriceville, Texas
Posts: 179
|
Quote:
Nice common sense tip.
__________________
Clint aka billybaloneey '94 - C4 ZR-1 #445 - Black/Black '05 - C6 silver/black 6sp '85 - C4 white/graphite (almost done) automatic '78 - C3 silver/black (a work in progress) automatic |
|
|
|

|
|
|
#10 | |
 Join Date: Apr 2007
Location: Northern VA
Posts: 2,661
|
Quote:
|
|
|
|

|
 |
| Thread Tools | |
| Display Modes | |
|
|