
|
 03-29-2013
|
#1 |
|
Join Date: Oct 2011
Location: Shalimar, FL
Posts: 192
|
Plenum and IHs out for porting. I want to remove or wire open the
secondaries while everything is opened up. I DO want to remove all the secondary system vacume components under the plenum. Tired of looking at all the spaghetti. Any step by step guides posted with pics? Lots of posts that say "Rip em out" but Im looking for something more specific. What to remove, what open holes to plug, what wires to unplug or leave in, etc, etc. I do want to maintain the cruise control. With help maybe I can get it right the first time. Thanks |

|

|
|
03-29-2013
|
#2 | |
  Join Date: Aug 2009
Location: South Dakota/California
Posts: 3,824
|
Quote:
I would NOT use wire to hold the secondaries open......but then again...... if you are not sure you want to eliminate the secondaries.....maybe a temporary fix using wire would be your best option.  Using wire to fix the secondaries open is a lot simpler for sure especially if the engine is in the car. See Technical Index LT5 Eliminated Systems Vacuum Systems (Secondary and Cruize/HVAC)
__________________
Left Clickable links -Solutions- LT5 Modifications/Rebuild Tricks Low Mileage ZR-1 Restoration 1990 Corvette (L98) Modifications LT5 Eliminated Systems LT5 Added Systems LT5/ZR-1 Fluids 1995 LT5 SPECIFIC TOP END REBUILD TRICKS Last edited by Dynomite; 03-29-2013 at 11:34 AM. |
|
|
|
|
|
03-29-2013
|
#3 | |
|
Join Date: Oct 2011
Location: Shalimar, FL
Posts: 192
|
Quote:
in the second two photos (cruise) remains? |
|
|
|
|
|
03-29-2013
|
#4 | |
|
Join Date: Aug 2009
Location: South Dakota/California
Posts: 3,824
|
Quote:
 Cruize Control and HVAC Vacuum System ..............................EVAP Purge Vacuum System with Solenoid   Marc and Pete suggested to eliminate the EVAP Purge circuit completely and capping off that vacuum source under front of plenum. I just replaced my charcoal canister and Marc says he does not address that removal in the chip as it has no effect. I left that associated vacuum and electrical connection including the Evap Purge solenoid in place under the plenum.
__________________
Left Clickable links -Solutions- LT5 Modifications/Rebuild Tricks Low Mileage ZR-1 Restoration 1990 Corvette (L98) Modifications LT5 Eliminated Systems LT5 Added Systems LT5/ZR-1 Fluids 1995 LT5 SPECIFIC TOP END REBUILD TRICKS Last edited by Dynomite; 03-29-2013 at 11:34 AM. |
|
|
|
|
|
03-29-2013
|
#5 | |
|
Join Date: Oct 2011
Location: Shalimar, FL
Posts: 192
|
Quote:
so I will pull it. |
|
|
|
|
|
03-29-2013
|
#6 | |
|
Join Date: Aug 2009
Location: South Dakota/California
Posts: 3,824
|
Quote:
 Besides...I did not want to eliminate everything at once for fear that some would say I no longer have an LT5 
|
|
|
|
|
|
03-29-2013
|
#7 | |
|
Join Date: Oct 2011
Location: Shalimar, FL
Posts: 192
|
Quote:
Friday or Saturday and prob be back with more questions. Thanks |
|
|
|
|
|
03-29-2013
|
#8 | |
|
Join Date: Aug 2009
Location: South Dakota/California
Posts: 3,824
|
Quote:
I would NOT use wire to hold the secondaries open......but then again...... if you are not sure you want to eliminate the secondaries.....maybe a temporary fix using wire would be your best option. Using wire to fix the secondaries open is a lot simpler for sure especially if the engine is in the car. When you pull the plenum (I guess you are already past that stage) do not forget to draw down the coolant level a bit so you do not get coolant in the cylinders. See item #4 LT5 Eliminated Systems I think you have to modify your chip in the ECM to accomodate the fact you eliminated the vacuum system and secondaries. The custom chip would change the fueling for the secondary injectors for example Marc Haibeck Custom Fueling   
__________________
Left Clickable links -Solutions- LT5 Modifications/Rebuild Tricks Low Mileage ZR-1 Restoration 1990 Corvette (L98) Modifications LT5 Eliminated Systems LT5 Added Systems LT5/ZR-1 Fluids 1995 LT5 SPECIFIC TOP END REBUILD TRICKS Last edited by Dynomite; 03-29-2013 at 11:22 AM. |
|
|
|
|
|
03-29-2013
|
#9 |
  Join Date: Nov 2007
Location: Squires (near Ava MO in the Mark Twain N'tl Forest) - Missouri
Posts: 6,491
|
This topic strikes me as an item for the HOTB Newletter... Hmmmm...
Nice pix, there Cliff!! Well, just to add a few particulars for a "heads in place" procedure: (and I'll get to writing that article later)) Of course you'll need a chip (from Marc or whomever). In addition to secondary delete feature, he can also include in the program (as a minor expense) a - -decelleration fuel moderation that will suppress "popping" in the headers, should you have them.You may need a plenum gaskets, an injector housing gasket set, and you'll need a breather box gasket (that squarish box in the bottom - front of the valley with the two (approx) 1-3/4" hoses coming out of it, that run to the injector housings.) Removing the secondary harness including the reservoir, check valves, and vacuum actuators is all pretty straight forward. (If one has the mechanical skills enough to get the plenum and IHs off, then the rest is equally easy!) Only remove that which associated with the driver's side plenum vacuum pipe (middle of the plenum, between the runners) and the vacuum pump. (The passenger side plenum vacuum tube runs the cruise control and the HVAC systems.) Here's a schematic of the vacuum harness under the plenum. Location of a couple components vary - e.g., the secondary vacuum sensor switch. However, the "pink" highlight is the secondary circuit which is essentially the same. 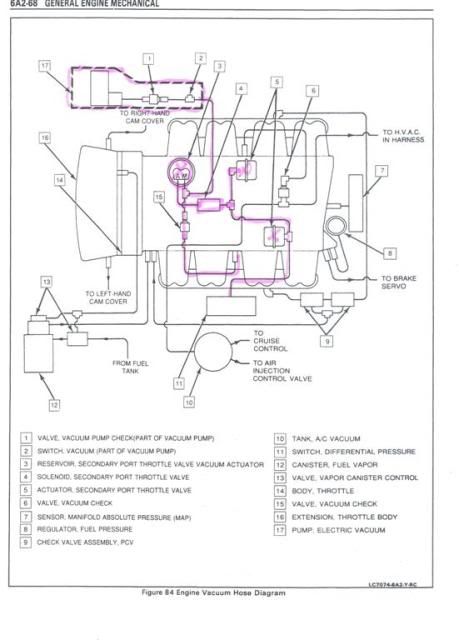 Secondaries removed... 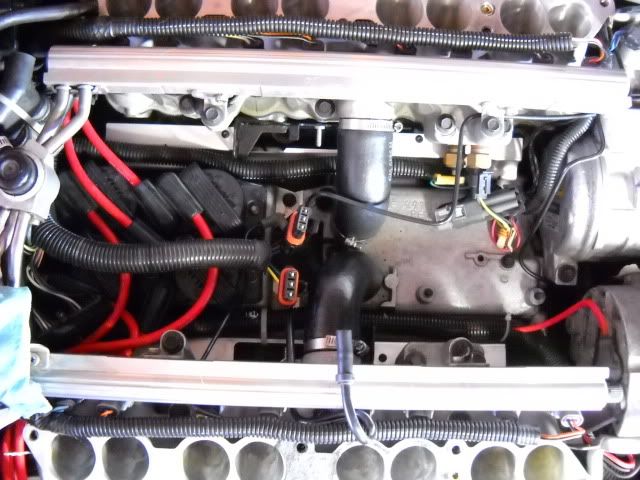 As for removing the Secondary Port Throttle (SPT) plates, NOW is the time for a little paranoia!You'll have to remove the breather box cover in order to remove the SPT shafts near the front of the motor to keep from possibly ruining the shaft as you extract it. Once the SPT plates are removed, you remove the shaft and the bearing. Start by removing the little actuator arm from the shaft, but keep the little nut handy. You'll need to fashion a little tool (or I'll send you mine) to pull the shaft and bearing out. The bearing comes out with the shaft, so what works really well is a piece of a pipe nipple, about 3/4" inch (2 cm) long with an inside diameter of just over 5/8" (1.7 cm). This goes over the end of the threaded end of the shaft, centered around the bearing, resting on the boss but clear of the bearing. A fender washer with a small hole covers the top of the pipe nipple. After greasing up the threads and the top of the washer, the little nut from the little shaft arm (now removed) is screwed down against the washer. While keeping the shaft from turning with pliers, continue to screw the nut down against the washer which will draw the shaft and the bearing out together. To seal the bearing recess, a Dorman 555-108 freeze plug (or the like) with a smear of JB Weld on it is tapped into place. The secondary differential pressure switch (is under the ECM on a '90, but sometime later was moved to under the plenum) is left in place, except the vacuum hose is removed to leave the open end of the switch exposed to the atmosphere. IMPORTANT: The Full Power switch on a 90 must ALWAYS be left in the FULL POWER position. The piont is, the calibration splits the fueling dwell time between both primary and secondary injectors. If for any reason the secondaries are switched off, fueling is cut in half resulting in a very lean condition. (However, that said, the major contributor to the secondaries being turned off, other than the switch on a 90, is loss of vacuum in the secondary circuit. Well, that ain't gonna happen anymore!) Note: After 1990, the FULL POWER condition is handled in the deleted secondaries programming. On my 90 I soldered a wire between the terminals of the FULL POWER switch against either the switch somehow being turned off, or faulty contacts issue within the switch itself (not at all that uncommon). Note: At idle, only the primary injectors are running. But, just off idle, the secondaries are switched on and the fuel metering is shared between the two injectors beyond that. Note: Ted Demps said his mpg went down a couple miles. My experience is different. Mpg remainded essentially the same in spite of also completing the "500" package. (I measured mpg manually before and after with cruise control on at 70 yeilded 26.x in both cases. Color meOnce the plenum & IHs were off, it took under a 4 hours (no hurry) to pull and seal the SPT stuff. In my case there hasn't been a single downside to their removal that I'm aware of. It has been ALL GOOD. In addition to freedom from vacuum leak/vacuum pump issues, throttle response is improved, secondary valve remains clean(er), and perhaps there is some improvement in performance resulting from removing the plates and rods from the critical center of the air column. And, in my case net mpg remained unchanged. The one item I can't comment on is emmissions compliance. OBD-I cars are exempt from emmissions tests in IL. So, I've never tested it before or after to know what (if any) impact removing secondaries has had in that aspect. Perhaps someone that is required to meet emmissions can comment further in this regard. Just as an asside... I don't argue with anyone wishing to keep everything "as is". In fact, I dispise doing anything that is cobbled up, especially if it reduces reliability or driveability and generally too if it can't be reversed if I change my mind. This procedure is none of that. In the end, the "FBI 500" package, including the removal of the STPs, is a remarkable modification! Mine resulted in significant power increase without compromising mid range torque (actually increases it some!) overall reliablily, the integrity of the motor, mpg, idle quality, or (street manners) drivability (noiser exhaust excepted). That is some trick for 5.7L V8 without VVT or the like. Long live the ZR-1 & LT5!!
__________________
Good carz, good food, good friendz = the best of timez! 90 #1202 "FBI" top end ported & relieved Cam timing by "Pete the Greek" Sans secondaries Chip & dyno tuning by Haibeck Automotive SW headers, X-pipe, MF muffs Former Secretary, ZR-1 Net Registry Last edited by Paul Workman; 03-29-2013 at 11:09 AM. |
|
|
|
|
03-29-2013
|
#10 | |
|
Join Date: Aug 2009
Location: South Dakota/California
Posts: 3,824
|
Quote:
 As an aside....I went and modified some posts on that Cruize Control Vacuum line on passenger side which as you state shares vacuum with HVAC system interior Thanks Paul And Yes.....cannot stress enough....do NOT drop anything in Head Valve area when extracting the secondaries  Marc set Power Always On in the Chip for my 91' and as you say....I guess you cannot do that in the 90'
__________________
Left Clickable links -Solutions- LT5 Modifications/Rebuild Tricks Low Mileage ZR-1 Restoration 1990 Corvette (L98) Modifications LT5 Eliminated Systems LT5 Added Systems LT5/ZR-1 Fluids 1995 LT5 SPECIFIC TOP END REBUILD TRICKS Last edited by Dynomite; 03-29-2013 at 12:01 PM. |
|
|
|
|
 |
| Thread Tools | |
| Display Modes | |
|
|


 !!
!!

 Linear Mode

