
|
 01-04-2012
|
#1 |
 Join Date: Oct 2011
Location: Between Texas & Calif
Posts: 120
|
Has anyone had success repairing and repainting the corrosion found on the throttle body adjacent to the plate?
Here is my thought going forward.
__________________
Erv Myers 1990 ZR1 #1964 |

|

|
|
01-04-2012
|
#2 | |
 Join Date: Nov 2007
Location: Squires (near Ava MO in the Mark Twain N'tl Forest) - Missouri
Posts: 6,491
|
Quote:
As for screws, I got mine at Ace Hardware. Just a thought. P.
__________________
[I][COLOR="Blue"]Good carz, good food, good friendz = the best of timez![/COLOR][/I] 90 #1202 "FBI" top end ported & relieved Cam timing by "Pete the Greek" Sans secondaries Chip & dyno tuning by Haibeck Automotive SW headers, X-pipe, MF muffs Former Secretary, ZR-1 Net Registry |
|
|
|
|
|
01-04-2012
|
#3 |
|
Join Date: Oct 2011
Location: Between Texas & Calif
Posts: 120
|
Are there "How To's" to bypass the coolant to the throttle body?
__________________
Erv Myers 1990 ZR1 #1964 |
|
|
|
|
01-04-2012
|
#4 |
|
Join Date: Nov 2007
Location: Squires (near Ava MO in the Mark Twain N'tl Forest) - Missouri
Posts: 6,491
|
Two ways to do it: the bypass or plugging. Either will work, but plugging allows you to remove some plumbing, and bypassing can be done without removing the plenum.
Bypass: Remove the two curved rubber hoses that lead to the TB from connections on the plenum, and replace the two short tubes with a longer piece to connect the two plenum connections together. (The driver's side is a small elbow pipe between the #1 & 3 cylinder runners. The passenger side is a "T" connection.) As for routing, some route the hose out and under the plenum, attaching it to the coolant cross-over pipe that is there. Or, some run a rubber hose under the plenum to connect the two IH connections together. Either will work. __________________ Plugging off the coolant passage: This requires removing the plenum to access the little coolant passages in the IHs that route coolant up through the plenum (to the afore mentioned connections). Drill and tap the holes and place an aluminum pipe plug, wrapped with Teflon tape. Mine happens to be brass (aluminum would be better in the long run). Anyway, you can see the hex-hole'ed plug in my IH. That's there to shut off the coolant to the TB (one on each IH). 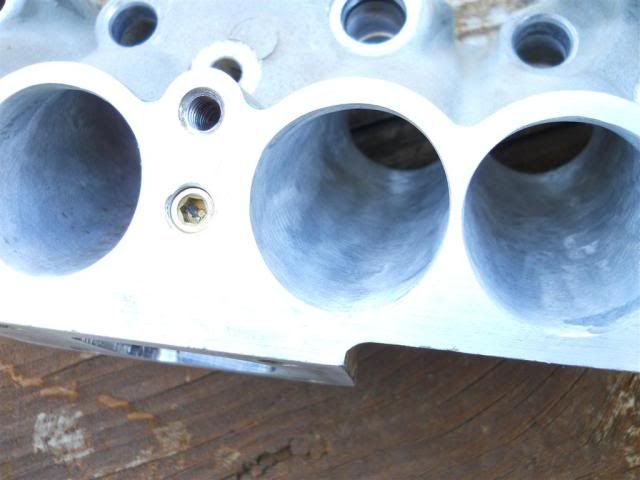 There is a line on the passenger side that comes up from the reserve tank area, runs along the plenum rail to the "T" connection on the passenger side of the plenum. Follow that rubber line back under the reserve coolant tank area, cut it and plug the hose (I used a metal shank from a bolt, wrapping the hose with a worm-type hose clamp and tie-wrapped it out of sight.) Remove the excess plumbing...OR DON"T! (I left the plumbing in place - gives the the motor more of a stock look.  The choice is yours.). The choice is yours.).A couple nice benefits for cutting off the coolant to the TB, in addition to the corrosion problem:
Hope this helps. Oh, if your wondering about the runner diameters being uniform, instead of the primary being smaller, it is because mine has the "FBI 500" package applied to it. hence the uniformity of the runner diameters. P.
__________________
[I][COLOR="Blue"]Good carz, good food, good friendz = the best of timez![/COLOR][/I] 90 #1202 "FBI" top end ported & relieved Cam timing by "Pete the Greek" Sans secondaries Chip & dyno tuning by Haibeck Automotive SW headers, X-pipe, MF muffs Former Secretary, ZR-1 Net Registry |
|
|
|
|
01-04-2012
|
#5 |
|
Join Date: Aug 2005
Location: Scottsdale, AZ
Posts: 2,450
|
|
|
|
|
|
01-04-2012
|
#6 | |

Join Date: Dec 2007
Location: Fremont, CA
Posts: 3,088
|
Quote:
|
|
|
|
|
|
01-05-2012
|
#7 | |
|
Join Date: Oct 2011
Location: Between Texas & Calif
Posts: 120
|
Quote:
Was the plate stuck, or bolts seized or both?? Thought of soaking with PB or WD40 before I attempt the removal. Probably get another plate from Carter.
__________________
Erv Myers 1990 ZR1 #1964 Last edited by Socalerv; 01-05-2012 at 03:12 PM. |
|
|
|
|
|
01-05-2012
|
#8 | |
 Join Date: Jun 2004
Location: Texas
Posts: 2,431
|
Quote:

__________________
95 ZR-1 BLK/Gry #392 LT5 Reg# 868 *RIP* ZR1NET Founding Mem #155 |
|
|
|
|
|
01-06-2012
|
#9 |

Join Date: Dec 2004
Location: Jacksonville, FL USA
Posts: 4,637
|
Get another plate from Carter. They are pure ZR-1 jewelery!!!! Your girl will love you for it too!
Sorry for the shameless plug for Carter, but he does the sweetest machine work this side of Mars!  Oh, Hi Carter! Oh, Hi Carter!If you want to stop the corrosion and retain the coolant flow you need to get rid of all the white powdery stuff. I used a brass brush + WD40 for most of it. Then I used acetone + paper towels. Then I used 1000 wet to make nice nice. Then, and I think this is the important part after removing all the white stuff & the pox marks. You have to coat the new gasket on all sides and the holes for the screws. Reason is to insulate the two metal parts and the screws from the coolant. It's electrolysis that causes the pox. Two dissimilar metals in contact with water ( coolant ) and in the presence of an electric current ( block is ground ). If you interrupt that circuit you're good to go. I did that to mine back in 05 when I did my injectors and it hasn't been back since!
__________________
1990 ZR-1, Black/grey, #2233, stock. ZR-1 Net Reg Founding Member #316 & NCM member Last edited by tomtom72; 01-06-2012 at 07:46 PM. |
|
|
|
|
01-06-2012
|
#10 | |
|
Join Date: Jun 2004
Location: Texas
Posts: 2,431
|
Quote:
__________________
95 ZR-1 BLK/Gry #392 LT5 Reg# 868 *RIP* ZR1NET Founding Mem #155 |
|
|
|
|
 |
|
|


 Linear Mode

