
|
|
|
 04-25-2009
|
#1 |
 Join Date: Nov 2007
Location: Squires (near Ava MO in the Mark Twain N'tl Forest) - Missouri
Posts: 6,466
|
I'm hoping to expand the ranks of the "FBI" (Fast Boyz of Illinoiz) soon by completing the porting project this w/e and put 'er back together.
A new Marc H chip, tuned for an additional 50+ hp, NO secondary throttle plates or the stuff to run 'em, 36mm tapered waaaay down the throat of the heads This is my first porting job of this magnitude. Gotta tell ya...I approach "the moment of truth" with a good deal of anxiety. Will the dreaded "SES" light come on...or not? Drum-roll later this w/e. Once past the start-up, then on to install the headers and new exhaust just waiting patiently! (Can ya tell I'm gettin excited?? WooHoo!  ) )P. Last edited by Paul Workman; 04-25-2009 at 08:44 AM. |

|

|
|
04-25-2009
|
#2 |
 
Join Date: Dec 2004
Location: Jacksonville, FL USA
Posts: 4,609
|
 Paul good luck with the grand opening! Paul good luck with the grand opening!May all your DIC lights come on and go out promptly, except for the FULL POWER one! 
__________________
1990 ZR-1, Black/grey, #2233, stock. ZR-1 Net Reg Founding Member #316 & NCM member |
|
|
|
|
04-25-2009
|
#3 |
 Join Date: Apr 2007
Location: Northern VA
Posts: 2,646
|
Hey Paul, can you post some pics of your finished porting work?
And good luck with the reassembly and start up. |
|
|
|
|
04-25-2009
|
#4 | |
|
Join Date: Nov 2007
Location: Squires (near Ava MO in the Mark Twain N'tl Forest) - Missouri
Posts: 6,466
|
Quote:
 Those that pay someone else to do the porting...would just not understand; kinda like reading about it opposed to being there, I recon. No matter what, I'm having fun! Those that pay someone else to do the porting...would just not understand; kinda like reading about it opposed to being there, I recon. No matter what, I'm having fun!More later... P. |
|
|
|
|
|
04-26-2009
|
#5 |
|
Join Date: Nov 2007
Location: Squires (near Ava MO in the Mark Twain N'tl Forest) - Missouri
Posts: 6,466
|
The IHs are were the most difficult (for me) in terms of material removed and time. Here you can see the IH runnner, all 36+mm (after some sanding with the drum). BIG ain't they! The secondary bosses are but minimal blips with (per Locobob's suggestion) some shaping around them to ease air flow. Couple of pointers: There is a thin angle spot in the casting near a couple of the hold-down bolt bosses. Be careful around them. And, be careful when removing the primary boss (90-92s). The O-ring at the top of the boss extends into the casting toward the area you will be grinding at. You don't want to expose that gasket, if possible. Instead, ease a bit more off the top to so the ball gauge will go over it. Besides, you'll end up straightening out the runner a little more, and that is a good thing.
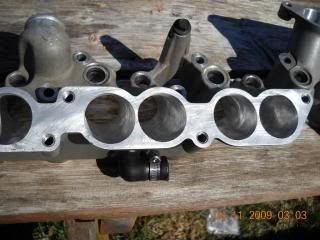 Tho you cannot see it in the photo, the bosses are thinned out quite a bit; to almost a sharp edge. There are a couple bosses where the secondary boss lip was nicked and results in exposing some of the O ring seal. However, the SOP "tip" from Marc H is to put a washer under the fuel rail tie-down points. This lifts the injectors just enough sometimes and avoids welding and re-shaping - it did in my two cases. 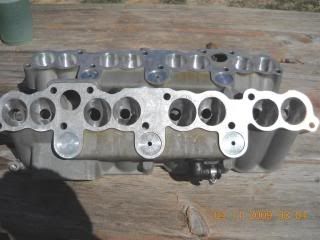 Onto the heads... A plastic shower curtain and masking tap and some heavy duty shop paper towels (stuffed into the holes and packed firmly in) seals off the bottom of the runner.  Continued on the next post |
|
|
|
|
04-26-2009
|
#6 |
|
Join Date: Nov 2007
Location: Squires (near Ava MO in the Mark Twain N'tl Forest) - Missouri
Posts: 6,466
|
The IHs were bolted on and the heads were scribed to guide the cutting. In most cases the cutting was more on one side than than simply opening up the existing holes. I found the metal in the heads (as others warned me) cuts rather quickly, compared to the IHs, for example. No time to get rambunctious! You can see the tracks of the bur as I "corkscrewed" it down the bore. I found it especially helpful to have my second die grinder tooled up with the sanding roll. This way I could do a quick smoothing before taking a measurement. The sanding roll very quickly straightens out any ridges left by the bur in the heads (especially)
 This is one of Pete's balls...The 35mm one to be exact. The taper will need to be elongated a bit more - allowing the ball to enter another 1/8" or so. Then I can open the top of the bore to seat the 36mm ball, and then straightening the walls for a nice straight taper. (The steel ball gauges are held by one of those $1 telescoping magnet retrieval tools) 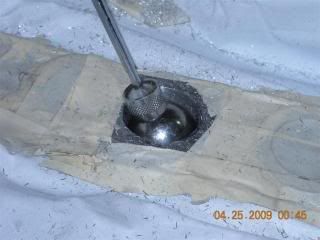 After the roll sander has straightened the tapered bore, a flap wheel cleans up any minor nicks. This happens to be a secondary port - note the hole for the throttle plate shaft. 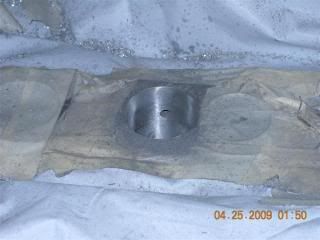 Getting the plugs out of the bore w/o letting any filings or grinding material fall into the cylinder is the tricky part for an "on the car" head matching chore. I found using 2-3 plugs made of 1/2 sheet of those heavy blue paper shop towels worked good. Cloth rag plugs tend to pop out of place when they sometimes get snagged by the bur (I found). But, paper does not get caught by the bur so much. And having 2 or more plugs (I found out) is an important safety device should a plug above get loosened and allow some material to fall down. (I would suggest experimenting on those cylinders where the valve is shut tight, just in case the technique is not fully developed...don't ask! Regarding the use of the paper plugs, I found the paper plugs stay put much better so that I was able to get the nozzle of the vacuum cleaner right down on top of the plug. This removed 95% of the debris. Then I could pull the plug (soaked in WD40, BTW) out, wiping the sides of the bore at the same time. Then repeat for the second (and third) plug and "all was well". However, if there is an oops!, I found masking tape wrapped sticky side out on the tip of a screwdriver worked very well at grabbing the odd sliver(s) that got by the plugs. (The same trick using a coat hanger wire even snagged a couple slivers resting on the top of a piston in a cylinder where the valve was open.) I'm sure this is "old hat" to the real experts (this being my first an expert does not make!), but since you are "grinding" too, I'm happy to show you where some of my "bread crumbs" are! Good luck with your project! As for those that are intimidated by the prospect of porting...you should be! But, once you get it, the water is fine! P. |
|
|
|
|
04-25-2009
|
#7 |

Join Date: May 2008
Location: USA
Posts: 1,093
|
Marc's chip gives an extra 50hp?
|
|
|
|
|
04-25-2009
|
#8 | |
|
Join Date: Nov 2007
Location: Squires (near Ava MO in the Mark Twain N'tl Forest) - Missouri
Posts: 6,466
|
Quote:
What this particular chip is supposed to do is:
P. |
|
|
|
|
|
04-25-2009
|
#9 | |
|
Join Date: May 2008
Location: USA
Posts: 1,093
|
Quote:
 You won't believe the difference in the car! Last edited by xlr8nflorida; 04-25-2009 at 03:00 PM. |
|
|
|
|
|
04-25-2009
|
#10 | |

Join Date: Dec 2003
Location: Chicagoland,IL
Posts: 2,667
|
Quote:
WOW i gotta get me one of those 50 hp chips.lol I think you mean 50 hp gain with all your mods. Paul i would love to be there when you start her and first drive just to see the look on your face,ask your wife to be ready with camera. After header/exhaust you should be around 400rwhp can you say 11's Pete
__________________
'91 #1635 PoloGreen 350 LT5 11.09 @ 129.27 11.04 @ 128.86 474RWHP 400RWTQ http://www.youtube.com/watch?v=SFNFOhGGlR4 http://www.youtube.com/watch?v=ZlRIOMwaDYY https://sites.google.com/site/peteszr1garage |
|
|
|
|
 |
|
|


 Hybrid Mode
