
|
|
|
 08-31-2019
|
#1 |
 Join Date: Nov 2007
Location: Squires (near Ava MO in the Mark Twain N'tl Forest) - Missouri
Posts: 6,466
|
Took me 2-1/2 hours & a couple BandAids to remove and reinstall a new belt today. Gawd! There must be an easier way/faster way to do it. Suggestions?
Last edited by ZBrink; 01-25-2025 at 04:29 AM. |

|

|
|
09-01-2019
|
#2 |
 Join Date: Nov 2011
Location: Dunbarton NH
Posts: 7,572
|
Paul, I was able to use a long handle, flex-head 1/2" drive ratchet.
First remove the air coupler from the air horn. Then put the drive in the tensioner and start the handle on the drivers-side of the air horn then clock it passed the passenger-side of the air horn and hook the ratchet on the throttle body. That will take the tension off the belt and will hold the tensioner in place. Made the job much easier. Last edited by ZBrink; 01-25-2025 at 04:38 AM. |
|
|
|
|
09-01-2019
|
#3 | |
|
Join Date: Nov 2007
Location: Squires (near Ava MO in the Mark Twain N'tl Forest) - Missouri
Posts: 6,466
|
Quote:
Looking back, part of the problem was the way the new belt was packaged. It came folded in such a way as to make a Samurai (blacksmith) proud and wrapped tightly in a paper sleeve - the whole package would just about fit on palm of my open hand (ok, I have big hands?). When I first saw it, I said to myself, "Naw...That can't be the right belt!!" Can we say kinked?? Anyway... I got distracted and had to leave it and come back the next morning. Once the belt had a chance to relax (de-kink itself) AND I retracted the tensioner fully, it went on easy-peazy. It's amazing how sometimes when you "hit a wall" with a mechanical installation how leaving it and coming back with a fresh look and how easy then the task just comes together! Funny now, yes. But, I thought some of us DIY guys would see the humor in my little folly! 
Last edited by Paul Workman; 09-01-2019 at 08:50 AM. |
|
|
|
|
|
09-01-2019
|
#4 |
 Join Date: Aug 2009
Location: South Dakota/California
Posts: 3,815
|
My Method does not matter if belt is kinked and you do not have to use a lasso
 Post 287 - Replacing the Serpentine Belt I replaced my Steel Water Pump Pulley with a Billet Aluminum Water Pump Pulley. The Billet Aluminum Water Pump Pulley does not have the ridge (larger diameter) on the front. Place New Serpentine Belt on all pulleys except the water pump pulley. Compress Belt Tensioner with hand so you can insert a stick of wood (1" x 2" x 24")..... or long handle 1/2" drive breaker bar to hold Belt Tensioner compressed. Slide smooth backside of Serpentine Belt on Billet Aluminum Water Pump Pulley (easy since it has no ridge on front edge of Billet Aluminum Water Pump Pulley). Remove stick of wood or 1/2" drive breaker bar. This applies to LT5s and L98s. Now I know why I got the Billet Aliuminum Water Pump Pulley  LT5 Billet Aluminum Water Pump Pulley.....L98 Billet Aluminum Water Pump Pulley  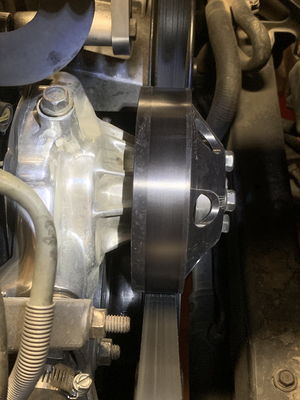 L98 with Air Pump Eliminated Note the Power Steering Pulley rides on smooth back side of Serpentine Belt on L98  Easy-Peazy 
__________________
Clickable links On Iphone Touchable Links -Solutions- LT5 Modifications/Rebuild Tricks Low Mileage ZR-1 Restoration 1990 Corvette (L98) Modifications LT5 Eliminated Systems LT5 Added Systems LT5/ZR-1 Fluids 1995 LT5 SPECIFIC TOP END REBUILD TRICKS Last edited by Dynomite; 09-01-2019 at 11:51 PM. |
|
|
|
|
09-01-2019
|
#5 |
|
Join Date: May 2007
Location: Chicagoland, IL
Posts: 9,685
|
I use a 1/2” drive breaker bar in the tensioner to pull it back, then slip a large flat blade screwdriver under belt and over alternator pulley.
|
|
|
|
|
09-01-2019
|
#6 |

Join Date: Dec 2007
Location: Fremont, CA
Posts: 3,093
|
There is a belt out there that is IMPOSSIBLE to install,I went through this the first time I replaced it years ago,it’s almost as if it was mis labeled from the factory. I can’t remember which brand,maybe Goodyear or OEM GM. after fighting with this for too long,went and got a GATES belt and had it on the car in the time it takes to loop it around all the pulleys and release the tension. This reminds me,I need to change out that belt.
|
|
|
|
|
09-02-2019
|
#7 |
 Join Date: Sep 2005
Posts: 90
|
I think the procedure in the manual was to install the belt over and behind the water pump pulley. After the belt is around all the other pulleys, you can pull the belt forward onto the water pump pulley while pulling back on the tensioner. This worked well when I removed and reinstalled the original belt.
Even with that procedure, some belts will not go on. I had a new belt with the exact same part number as the original belt that would not go on. I think the Goodyear belt went on easily without this procedure. |
|
|
|
|
09-02-2019
|
#8 |
|
Join Date: Jun 2006
Location: Sparks, NV
Posts: 2,843
|
It all depends on the length of the belt. Been down that road. However shorter is better, but a bit harder to install.
H http://www.zr1.net/forum/showthread....erpentine+belt |
|
|
|
|
09-02-2019
|
#9 | |
|
Join Date: Aug 2009
Location: South Dakota/California
Posts: 3,815
|
Quote:

__________________
Clickable links On Iphone Touchable Links -Solutions- LT5 Modifications/Rebuild Tricks Low Mileage ZR-1 Restoration 1990 Corvette (L98) Modifications LT5 Eliminated Systems LT5 Added Systems LT5/ZR-1 Fluids 1995 LT5 SPECIFIC TOP END REBUILD TRICKS |
|
|
|
|
|
09-02-2019
|
#10 | |
|
Join Date: Nov 2007
Location: Squires (near Ava MO in the Mark Twain N'tl Forest) - Missouri
Posts: 6,466
|
Quote:
THANKS 4 ALL THE RESPONSES! 
|
|
|
|
|
 |
| Thread Tools | |
| Display Modes | |
|
|


 Hybrid Mode
