|
|
|
|
#1 |
|
Join Date: Jan 2012
Location: Delaware
Posts: 20
|
To bypass the clutch swith do I just take the thick yellow and purple wire out of this harness and splice them together??
http://i134.photobucket.com/albums/q...f/DSCN5277.jpg I thought I could just wire the white connector thats hanging down together and that would do it. Keep in mind I am color blind and having the typical No Crank issue with a fully charged battery. Any help would be appreciated. http://i134.photobucket.com/albums/q...f/DSCN5278.jpg http://i134.photobucket.com/albums/q...f/DSCN5280.jpg I borrowed these pics from LGAFF and it looks like he just cut the yellow and purple wire out of the connector and spliced them together.. is that all it takes? Don |
|
|

|
|
|
#2 |
 Join Date: Mar 2007
Location: Crystal Lake, IL
Posts: 7,180
|
Yup, change your relays while you are in there too
__________________
LGAFF 90 #966-150K miles-sold 92 #234-sold 1987 Callaway TT #17 1991 ZR-1 #1359 |
|
|

|
|
|
#3 |
|
Join Date: Jan 2012
Location: Delaware
Posts: 20
|
LGAFF, thanks for the quick reply. What does the white connector hanging down do then, because it looks like it has a plunger that tells when he clutch is pressed as well.
Don |
|
|

|
|
|
#4 |
 Join Date: Mar 2007
Location: Crystal Lake, IL
Posts: 7,180
|
cruise control switch, turns cruise off when you depress the clutch
__________________
LGAFF 90 #966-150K miles-sold 92 #234-sold 1987 Callaway TT #17 1991 ZR-1 #1359 |
|
|

|
|
|
#5 |
|
Join Date: Jan 2012
Location: Delaware
Posts: 20
|
LGAFF, turned the key and she fired right up!!! Thanks for the confirmation for the color impaired!
Don |
|
|

|
|
|
#6 |
 Join Date: Mar 2007
Location: Crystal Lake, IL
Posts: 7,180
|
Now just be sure to press the clutch in whenever you start it....there are relays below the steering wheel you may want to change, one of those will sometimes also stop the car from starting when its bad
__________________
LGAFF 90 #966-150K miles-sold 92 #234-sold 1987 Callaway TT #17 1991 ZR-1 #1359 |
|
|

|
|
|
#7 |
|
Join Date: Apr 2009
Location: ITALY
Posts: 261
|
Hi guys...after bypass the clutch switch is better change the starter enable relay?
how i can check if it's good or not? Thanks in advance!!! Max |
|
|

|
|
|
#8 |
 Join Date: Nov 2007
Location: Squires (near Ava MO in the Mark Twain N'tl Forest) - Missouri
Posts: 6,466
|
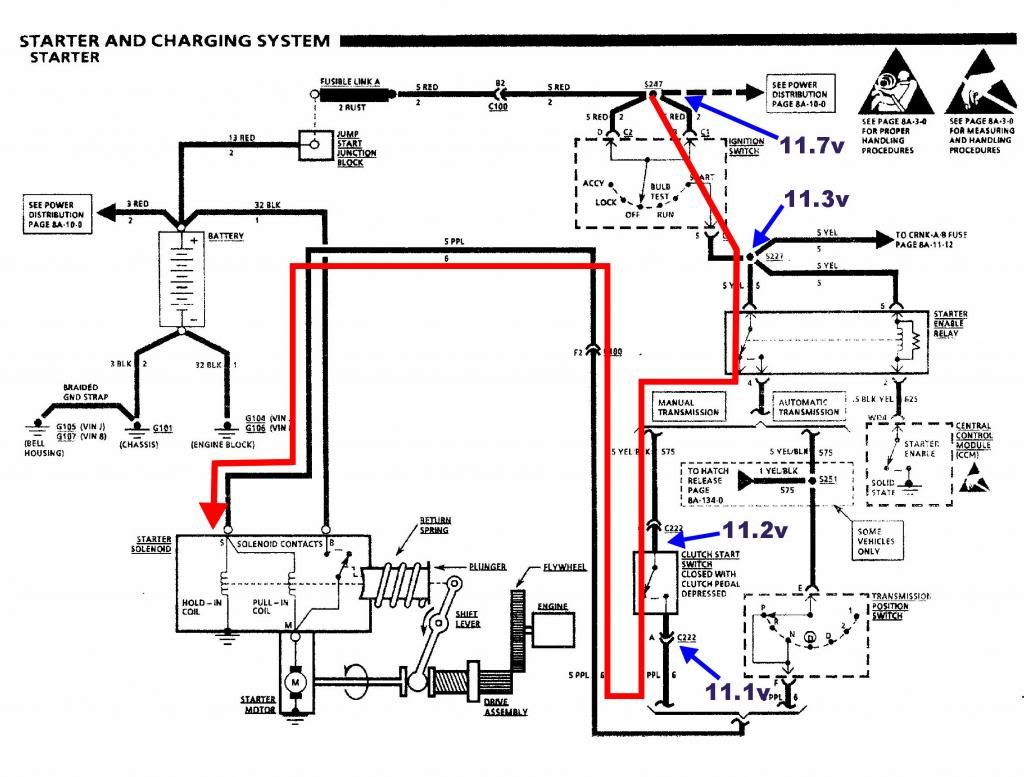
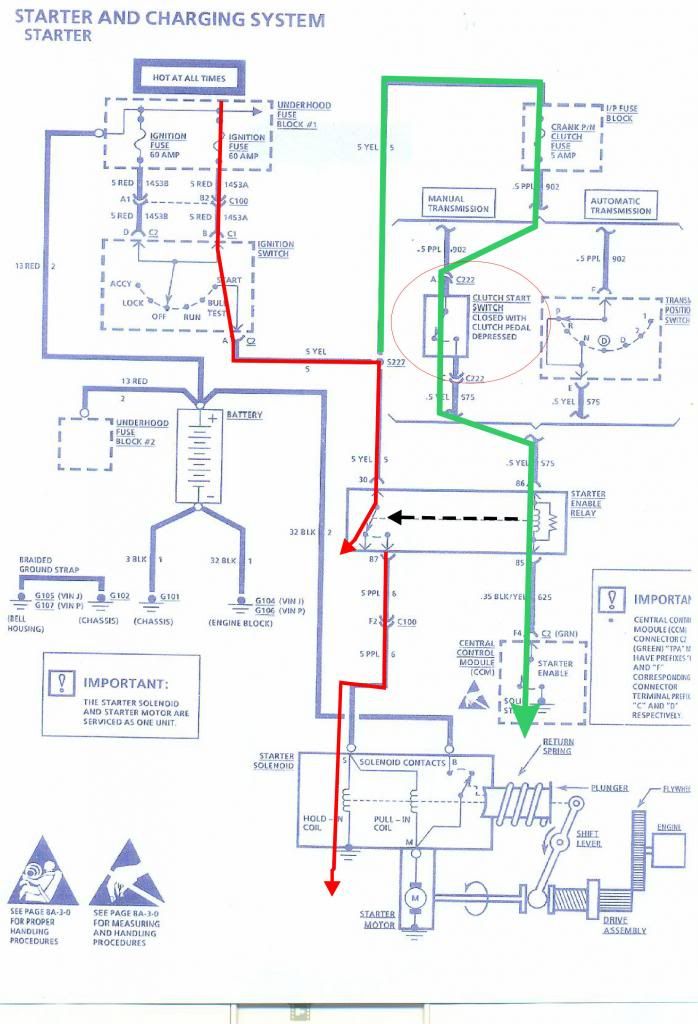
In ALL ZR-1s the clutch relay carries all the current drawn by the starter solenoid - a few amps. However, only on the 90-92s does the clutch switch carry the entire current to operate the starter solenoid. On the 93-95s the clutch switch enables the clutch relay (via the CCM), thus reducing the amperage load and the arching that erodes the clutch switch contact points (only) significantly.
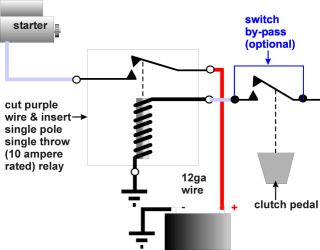
So, it might be a good idea to have a clutch start relay (and possibly some others too) in the glove box, along with an assortment of fuses too, just in case. 90-92 Clutch schematic(1)  93-95 Clutch scematic(1)  On this topic, Scottfab pointed out that arching can be reduced in the clutch switch IF the clutch is fully engaged before, during, and after the starter is engaged vs. turning the switch to START and then engaging the clutch switch...especially on a 90-92 car. Although the clutch switch is redundant to those of us taught to engage the clutch first any time the starter is engaged, I think it is important to have it in working order as a hedge against the unexpected - who knows what!? Essentially converting the clutch switch to the role played by the 93-95 cars is accomplished in a 90-92 car by installing a relay between the clutch switch and the starter solenoid. This way the relatively large solenoid current is isolated from both the start relay and the clutch switch - truly a mod worth considering to improve reliability of both the clutch relay (all cars) and the clutch switch in 90-92 cars.  Locating this relay near the fused link post (under the battery) provides a convenient location to access battery power for the starter solenoid path through the new relay. And, installing its own socket for the new relay allows for quick replacement, should it be needed. Paul ___________ ref: (1) Marc Haibeck article posted in HOTB. Last edited by Paul Workman; 06-23-2014 at 10:15 AM. |
|
|

|
|
|
#9 | |
  Join Date: Aug 2009
Location: South Dakota/California
Posts: 3,806
|
Quote:
Starter Relay, Wiring Harness, and Plugs Tricks I locate the Relay UNDER the ECM which is right next to the wire harness/wire to be cut. 60 / 80 AMP RELAY SPDT SINGLE POLE DOUBLE THROW NEW 654 Installed under ECM and in slot between brake booster and fire wall (perfect place for location of Relay). Wiring modified a bit to assure Pin #87a is not hot at any time. Pin #30: Purple wire to starter (use 3/8 inch connector on relay). Pin #87: Red wire battery positive 12v use 3/8 inch connector on relay (connected to battery positive multiple connection post). Pin #86: Battery ground (1/4 inch connector on relay connected to ground where battery 12 gauge wire grounded). Pin #85: Purple wire from ECM use 1/4 inch connector on relay (Red wire on early 1990 ZR-1). Pin #87a: Not hot at any time and not used.   Insert a short 1/2 inch long section of plastic hose over the center connector on the Relay which is NOT used in this application. 
__________________
Left Clickable links -Solutions- LT5 Modifications/Rebuild Tricks Low Mileage ZR-1 Restoration 1990 Corvette (L98) Modifications LT5 Eliminated Systems LT5 Added Systems LT5/ZR-1 Fluids 1995 LT5 SPECIFIC TOP END REBUILD TRICKS Last edited by Dynomite; 06-26-2014 at 02:53 PM. |
|
|
|

|
|
|
#10 | |
  Join Date: Aug 2009
Location: South Dakota/California
Posts: 3,806
|
Paul.....what is the Bold Red Line? I am assuming that depicts the current path through the relay we install without showing the relay?
Nice diagram.....  thanks, Cliff Quote:
Starter Contacts. The Starter Solenoid is shown in the left photo with slight burnt contacts in right photo.   The Solenoid contacts in left photo were wire brushed clean in right photo.  
__________________
Left Clickable links -Solutions- LT5 Modifications/Rebuild Tricks Low Mileage ZR-1 Restoration 1990 Corvette (L98) Modifications LT5 Eliminated Systems LT5 Added Systems LT5/ZR-1 Fluids 1995 LT5 SPECIFIC TOP END REBUILD TRICKS Last edited by Dynomite; 06-27-2014 at 02:22 AM. |
|
|
|

|
 |
|
|