
|
 04-17-2011
|
#1 |
 Join Date: Aug 2008
Location: Houston, TX
Posts: 2,314
|
I finally got some time to pull the water pump off and get ready to put the new one on before the Texas weather turns brutally hot. If any of you have to do this I highly highly recommend that you when you receive your new water pump that you take the gasket that comes with it and make a template out of cardboard and place each bolt you take out in it one at a time so you know where they go when you put them back in. Half of them are all different lengths.
    Also don?t forget about the one bolt that goes throught the A/C compressor through to the water pump which means removing the alternator which requires moving the plenum out of the way. Which blows booty hole for just one bolt. But it is what it is. Now im just waiting for my blue Samco radiator hose kit to arrive and finish it up. Last edited by rhipsher; 04-17-2011 at 06:34 PM. |

|

|
|
04-17-2011
|
#2 |
|
Join Date: Jul 2009
Location: Redding Calif
Posts: 223
|
Just a little confused here. I didn't quite follow as to why you had to pull the plenum. I R&R'ed my alternator last month without pulling the plenum.....just the air horn and TB.
|
|
|
|
|
04-17-2011
|
#3 |
|
Join Date: Aug 2008
Location: Houston, TX
Posts: 2,314
|
This bolt is why.
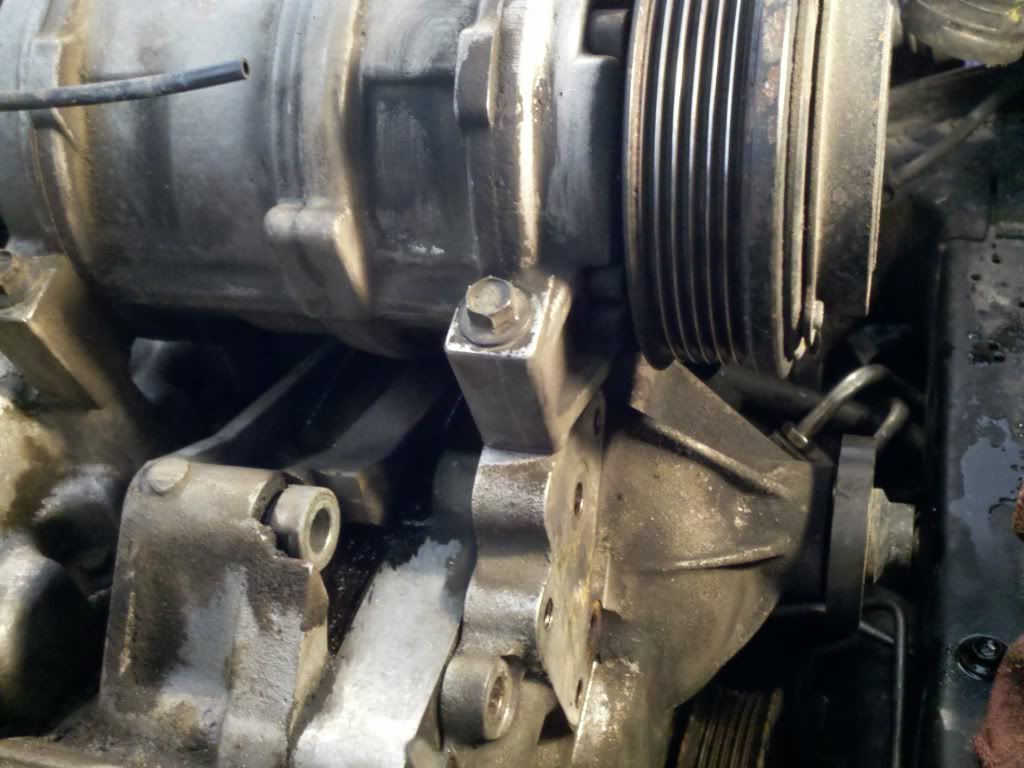 I could get a 10mm open end wrench on it from the front but could not break it loose. And there's no room to get a socket or ratchet on it unless you do it from the top. You still have to remove the alternator to get a socket on it. That's why. Sure you can remove the air horn and tb but I chose to just move the plenum aside. Last edited by rhipsher; 04-17-2011 at 07:35 PM. |
|
|
|
|
04-17-2011
|
#4 |
|
Join Date: Jul 2009
Location: Redding Calif
Posts: 223
|
Thanks for the picture. I wonder just how much they paid their GM enginering wizard to put that bolt in the worst possible location.
|
|
|
|
|
04-17-2011
|
#5 |
 Join Date: Dec 2003
Location: Arcadia, OK
Posts: 3,397
|
Rick,
You can save yourself a little trouble by putting the bolts in the proper hole in the new water pump on the bench, as you remove them from the old pump on the engine. Then, after the old pump is off, put it on the bench beside the new one & transfer the bolts over to the old pump & reinstall the new pump accordingly. Jerry :-)
__________________
Jerry Downey JERRYS LT5 GASKETS & PARTS http://www.jerrysgaskets.com 1994 ZR-1, Black/Black, Lingenfelter Aerobody, 416cu in, 3.91 gears, coil-over susp, Brembo brakes, etc. 2016 Black-Red, 3LT-Z51 Auto 8-speed. |
|
|
|
|
04-17-2011
|
#6 | |
|
Join Date: Aug 2008
Location: Houston, TX
Posts: 2,314
|
Quote:
|
|
|
|
|
|
04-17-2011
|
#7 |

Join Date: Aug 2007
Location: Spring TX
Posts: 1,341
|
you also risk the chance your kids come along and play with the bolts
|
|
|
|
|
04-17-2011
|
#8 |
|
Join Date: Aug 2008
Location: Houston, TX
Posts: 2,314
|
They are old enough now that they know better.
|
|
|
|
|
04-18-2011
|
#9 |
|
Join Date: Apr 2009
Location: Prather, CA
Posts: 804
|
Thanks for posting those two pics of the waterpump bolts, rhipsher! The previous owner of course just mixed them all up on mine. So those pics along with Jerry's bolt info will help me get them sorted out.

|
|
|
|
|
04-18-2011
|
#10 |
|
Join Date: Dec 2003
Location: Arcadia, OK
Posts: 3,397
|
This may help a bit more than the list. I added the quantity & length values.

__________________
Jerry Downey JERRYS LT5 GASKETS & PARTS http://www.jerrysgaskets.com 1994 ZR-1, Black/Black, Lingenfelter Aerobody, 416cu in, 3.91 gears, coil-over susp, Brembo brakes, etc. 2016 Black-Red, 3LT-Z51 Auto 8-speed. Last edited by A26B; 03-15-2020 at 10:52 AM. |
|
|
|
 |
|
|


 Linear Mode

