|
|
#1 |
 Join Date: Jul 2009
Location: Washington Township NJ
Posts: 49
|
Hey? My tach is sooo far out. When I'm at idle according to my snap on scanner it reads 675 rpm. The tach reads 2300. Aside from the obvious what other problems could this cause? I've read something about a rev limiter? Is this is real does it redad from the tach or the computer?
Thanks Rich |
|
|

|
|
|
#2 | |
  Join Date: Nov 2007
Location: Squires (near Ava MO in the Mark Twain N'tl Forest) - Missouri
Posts: 6,493
|
Quote:
As for DIY tach calibration, it isn't a big deal, if you can solder a few resistors. But, I must say an error of over 300%...is quite a bit! Usually the error is much lower. Mine was off 20+%, and I've heard of a couple a bit more (e.g, near 30%). Usually the error increases over time; a function of deterioration of a printed resistor circuit. But, in your case, I wonder if the ground on the voltage divider isn't lifted (or the like). I can dig up the calibration procedure, if you want to try it yourself. Who knows...the calibration process might just fix a lifted ground problem too. P.
__________________
Good carz, good food, good friendz = the best of timez! 90 #1202 "FBI" top end ported & relieved Cam timing by "Pete the Greek" Sans secondaries Chip & dyno tuning by Haibeck Automotive SW headers, X-pipe, MF muffs Former Secretary, ZR-1 Net Registry |
|
|
|

|
|
|
#3 |
 Join Date: Jul 2009
Location: Washington Township NJ
Posts: 49
|
I'm game for any ideas. If you can find the fix I would appreciate it.
Thanks Rich |
|
|

|
|
|
#4 |
  Join Date: Nov 2007
Location: Squires (near Ava MO in the Mark Twain N'tl Forest) - Missouri
Posts: 6,493
|
ZR-1 Tachometer Calibration
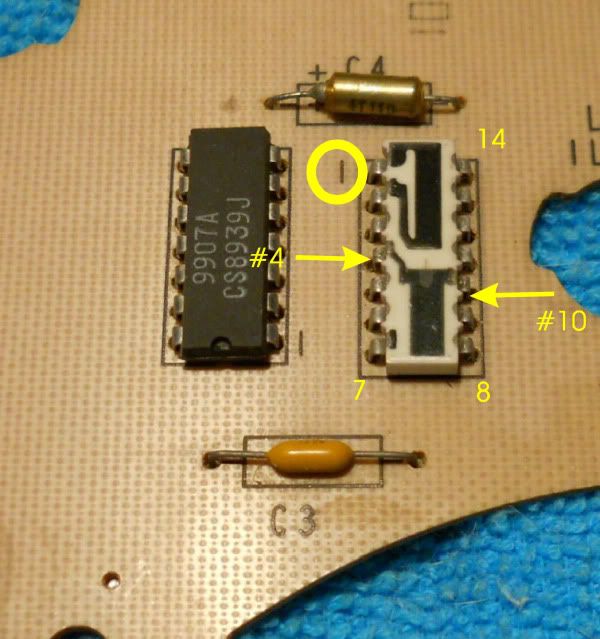
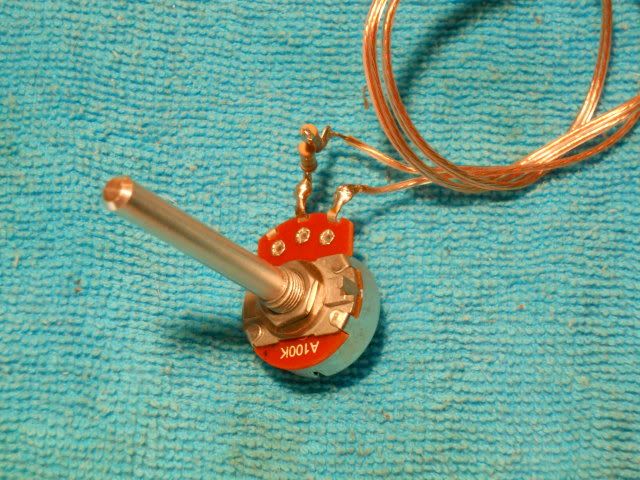
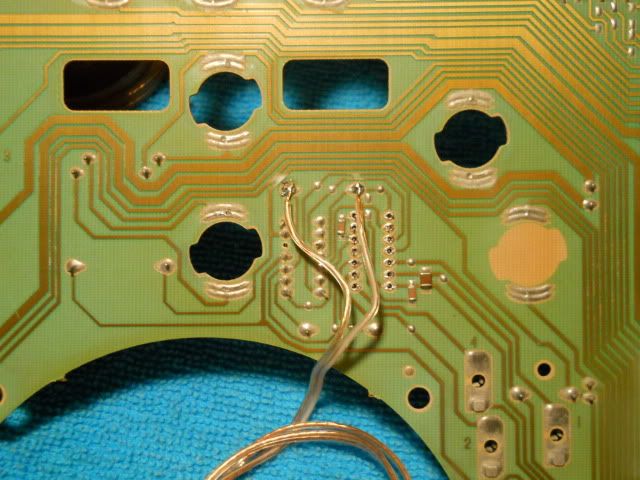
Special tools: A small set of side cutters A 40Watt solder iron (pencil type), flux core (22 gauge) solder 1/4" drive socket set and extensions 15mm socket and wrench Phillips screwdriver 10mm socket 1.Disconnect the battery! 2.Remove the ALDL connector and then the carpet hush panel under the steering column (two screws on right side, accessible only with the door open, plus 3 along the upper length of the panel and 3 (or was it 4?) along the lower length of the panel.) 3.Remove the metal support panel; 2 10mm bolts on the left side, and two more on the right side, snuggled up against the console carpeting. 4.Drop the steering column by unscrewing the tilt lever and inserting the key and turning it vertical (as needed). Then remove the two 15mm bolts holding the support plate and steering column in place and lower the wheel to the drivers seat cushion. Note: Do not fool with the yellow airbag wiring attached to the steering column! 5.Remove the bezel: There are 4 screws holding it in place 6.Remove the cluster: There are (4) 7mm screws holding the cluster in place. Once they are out, you can wiggle the cluster free of the connector on the bottom left side of the cluster. 7.Remove the PC board: Remove only the screws necessary to remove the PC board (You don’t have to take the cluster apart, unless you also want to clean the lens, for example.) Be careful when lifting the PC board off of the gauges pin connectors – do it evenly so the PC board remains parallel to the cluster; e.g., don’t just lift it up from one end, in other words! Take care to avoid bending the pins on the digital read out panel. 8.Clip leads #4 and #10 on the resistor pack: Here’s where you can use the small electronics side cutter. Be careful not to cut the wrong pins. (For reference, you can look at the other side, locate the ends of the capacitor located above the resistor pack and trace those traces to the resistor pack. Those are the leads to be clipped.)  9.Attach the potentiometer across C4: The resistance that will ultimately calibrate the tach varies. The top of the bell curve ranges between 140k to 220k (according to Marc Haibeck as I recall, but mine came in at 240k) Note: I suggest getting a 100k Ω pot and a couple 100k Ω resistors. In some combination you will be able to range between 100k Ω and 300k Ω. In the picture you can see two 100k Ω resistors in series, coupled with the pot for a total variable resistance range of 200k Ω to 300k Ω.  The calibration jig attached across C4 on the "green side" of the PC board...  10.Reinstall cluster: Reinstall the PC board to the cluster and reinstall the cluster into the dash, making sure the cluster connector has fully engaged the cluster. Let the pot hang on the wiring where you’ll have access to it for calibration adjustment. 11.Set calibration: Connect your scanner (e.g. to the ALDL connector), reconnect the battery, and start the motor. Compare the scanner to the tach and adjust the pot so the tach matches the scanner at about the 2000 or 3000 rpm range. Note: Sometimes the tach linearity is such that the tach may not track perfectly. That being the case, you can calibrate the tach to be accurate at the crucial (higher) rpm, but to do so you might have to reassemble the steering column etc in order to do a road test. However, according to those that have done this procedure some, the tracking error is not significant in most cases. And, because of lag – especially in the lower gears – a shift light is the way to get accurate shift rpm indication. It may be necessary to adjust the total resistance of the jig to get the tach into calibration. 12.Install the proper resistor in place of the pot: Disconnect the battery again. Remove cluster and the jig, taking care not to disturb the position of the pot stem, and read the resistance across the jig. Then select a resistor or combination of (series/parallel) resistors as needed to get as close as possible to the resistance measured across the jig and install the resistor(s) on the PC board, replacing the jig across C4. Use electrical tape to insulate the resistor wires from the PC board and arrange the resistor(s) to prevent the wires from touching anything else. 13.Reverse the disassembly procedure to reassemble the cluster, install it and return the dash and steering column to original configuration. Credits go to Marc Haibeck with whom I consulted when I performed this procedure on my car. Hope this helps! P. copyright 2012 All rights reserved
__________________
Good carz, good food, good friendz = the best of timez! 90 #1202 "FBI" top end ported & relieved Cam timing by "Pete the Greek" Sans secondaries Chip & dyno tuning by Haibeck Automotive SW headers, X-pipe, MF muffs Former Secretary, ZR-1 Net Registry Last edited by Paul Workman; 06-19-2012 at 06:15 AM. |
|
|

|
|
|
#5 |
 Join Date: Jan 2012
Location: Wisconsin
Posts: 887
|
My tach is also way off (maybe not 2K at idle, but not close to being accurate)
I had read that ~300K ohms was needed. Paul's suggestion of a pot is a good one. Thanks for the procedure too, Paul |
|
|

|
|
|
#6 | |
|
Join Date: Mar 2009
Location: Orlando, FL
Posts: 1,828
|
Quote:
__________________
2004 Z06/Z16 LeMans Commemorative Edition 1991 ZR-1 #302 White/Gray (sold) 1991 ZR-1 #1147 Red/Saddle (sold) |
|
|
|

|
|
|
#7 | |
 Join Date: May 2011
Location: Sydney, Australia
Posts: 2,479
|
Quote:
When you get the resistors make sure they are plus or minus 1%. There are a lot of company's that sell resistors plus or minus 5%. There is an phone app "ElectroDriod that tells you the ohms and tolerance levels. Nice Write up Paul.
__________________
Robert J. DeMarco [SIGPIC][/SIGPIC] [COLOR=blue]G[/COLOR][COLOR=red]rand[/COLOR] [COLOR=blue]S[/COLOR][COLOR=red]port[/COLOR] Registry Lifetime Member NCM Lifetime Member #2655 Pacecar Registry Member [COLOR=red]ZOOM Charter Member - ZR-1 Owners of Michigan[/COLOR] [COLOR=plum][I]ZR-1[/I] Registry member since 2012 [/COLOR] [COLOR=black]1990 LPE "368" Aerobody ZR-1, Last ZR-1 built by John[/COLOR] 1991 Callaway Aerobody ZR-1, DRM 500 1991 Shinoda Aerobody Spyder, 1998 Pace Car Last edited by cvette98pacecar; 06-19-2012 at 12:21 AM. |
|
|
|

|
|
|
#8 | |
  Join Date: Nov 2007
Location: Squires (near Ava MO in the Mark Twain N'tl Forest) - Missouri
Posts: 6,493
|
Quote:
Clipping the leads on the offending resistor pack removes at least that resistor from ever affecting the calibration again. As for the discrepancy between the 300k reference and the 140-220k (this procedure) is because resistors in parallel result in less resistance across them than the lowest value. The combination of the failing resistor and an arbitrary value like 300k Ω could result in exactly the value needed...or miss, depending on what the true value should be. Rt = 1/((1/r1)+(1/r2)...) where (parallel) Resistance total can be determined for different variables of two or many parallel resistor values.Example: a 300k in parallel with another 300k would result = 1/((1/300)+(1/300)) = 150k R(total) This little formula and possibly adding resistors in series can be used to hone in on the exact value needed. P.
__________________
Good carz, good food, good friendz = the best of timez! 90 #1202 "FBI" top end ported & relieved Cam timing by "Pete the Greek" Sans secondaries Chip & dyno tuning by Haibeck Automotive SW headers, X-pipe, MF muffs Former Secretary, ZR-1 Net Registry Last edited by Paul Workman; 06-19-2012 at 09:28 AM. |
|
|
|

|
|
|
#9 |
 Join Date: Jul 2009
Location: Washington Township NJ
Posts: 49
|
Thanks Paul, I will attempt this operation this weekend.
Thanks Rich |
|
|

|
|
|
#10 |
|
Join Date: Aug 2005
Location: Iuka, Mississippi 38852
Posts: 756
|
Thanks from me also for this article as i have a 90 Z and a 91 tuned port and both tachometers are incorrect.
|
|
|

|
 |
|
|